| View previous topic :: View next topic |
| Author |
Message |
Frank.61
Joined: 28 Nov 2013
Posts: 108
Location: Maasmechelen, Belgium
|
 Posted: Sun Mar 02, 2014 6:04 pm Post subject: Posted: Sun Mar 02, 2014 6:04 pm Post subject: |
 |
|
Some more pics
See the original grinding marks.
Inspected the inside and tubes, which are as new (no marks whatsoever).
New oil seals are easy to get and death cheap but dust seal is another matter.
Can't get any and did contact Paioli (was for a period the licence holder of Ceriani/Forcella Italia) but they told me that although the former owner was a friend and business relation of the Paioli family, unfortunately they did not have any information and suggestion on this fork and the seals etc. 
Did wish me luck in getting this "iconic part of motorcycle" in it former state though 
Did contact Ariete in Italy but they did not have anything remotely usable.
Well who knows maybe someone knows a solution to the dust seal issue.
Frank |
|
| Back to top |
|
 |
Frank.61
Joined: 28 Nov 2013
Posts: 108
Location: Maasmechelen, Belgium
|
| Posted: Wed Mar 05, 2014 2:50 pm Post subject: |
|
|
Hi,
Anyone who knows what Aluminium alloys are used for the SB4 (HB2/3, KB2/3, DB1) parts?
It sound strange but for the correct de-anodise process it is apparently important to know what alloy the parts are made of.
This to make sure they dont get stains (very difficult to remove). 
As far as I know the gusset plates (frame) and feet rest base plates are made of Avional 14 (2014A).
As told before I want to de-anodise most parts in order to be able to remove scratches etc., polish them and re-anodise them again. 
Maybe someone knows something more then I do

Regards,
Frank |
|
| Back to top |
|
|
2bims

Joined: 03 Apr 2010
Posts: 7289
|
| Posted: Wed Mar 05, 2014 3:55 pm Post subject: |
|
|
Motorcycle specs says this for Sb4
Frame Lower cradle and connecting side plates. These plates are made from machined Avional, whilst the tubes are made from Chrome-molybdenum
http://www.motorcyclespecs.co.za/model/bimota/bimota_sb4.htm
Bimota have the distinction of making the world's most expensive motorcycles. They are handmade, bespoke creations using all the very best components. They are labour intensive to make, beautifully finished and very fast. Bimota make exclusive, expensive, luxurious sports bikes that approach motorcycle perfection, that ideal but elusive marriage between Japanese horsepower and a frame that can deliver the goods. Take one large Japanese powerplant and place it in a unique frame with the best suspension, wheels and brakes money can buy.
The SB4 is built around Suzuki's GSX1100 with the engine carried by Bimota's chrome-moly, semi-cradle that supports the motor from the sides with the top tubes unusually joining ahead of the forks and steering head for extra rigidity. The swing-arm and rising-rate, rear suspension are anchored to the frame by a huge plate of Avional 14, an aircraft quality alloy. This crucial structure is milled from a solid block, glued and then bolted in place, all in pursuit of the perfect steering head/swing-arm relation. The frame plus swing-arm weigh just 351b.It is light and low on the move with 16in wheels fitted with low-profile radial tyres. Bimota are the only company to fit radials as original equipment rubber. Suspension is by Ceriani telehydraulic forks with seven-way adjustable rebound damping and a De Carbon unit at the back. The rear rocker arm and all the linkages are lovingly made, rose joints and quality alloy details are everywhere. The motor is stock except for a four-into-two Bimota exhaust and some extremely high gearing. The tall ratios complement Bimota's aerodynamic fairing and bodywork to achieve high speed and give the GSX1100 full top end expression, ISOmph and still pulling.
The riding position is uncompromising and built for maximum speed work. The rider is stretched, fully prone, reaching down to the clip-ons across the broad back of the tank, feet high on the rearsets, knees tucked into the tank cutaways. It is cramped but strangely comfortable. Everything about the Bimota sparkles with quality. Little is cast, it is all either machined from solid or press-forged with TIG welding throughout.
The bodywork is all in fibreglass-reinforced plastic and fits like a glove. The bike exudes class and confidence. The later SB5 uses the bigger 1135cc Suzuki engine but is essentially unchanged except for a longer wheel-base and different weight distribution. The one outstanding difference is the provision of a dual seat. Previous Bimota bikes had all been strictly solo machines.
Source: The Worlds Fastest Motorcycles by Michael Scott & John Cutts |
|
| Back to top |
|
|
bimotanige

Joined: 12 Jul 2010
Posts: 582
Location: yorkshire
|
| Posted: Fri Mar 07, 2014 10:17 am Post subject: |
|
|
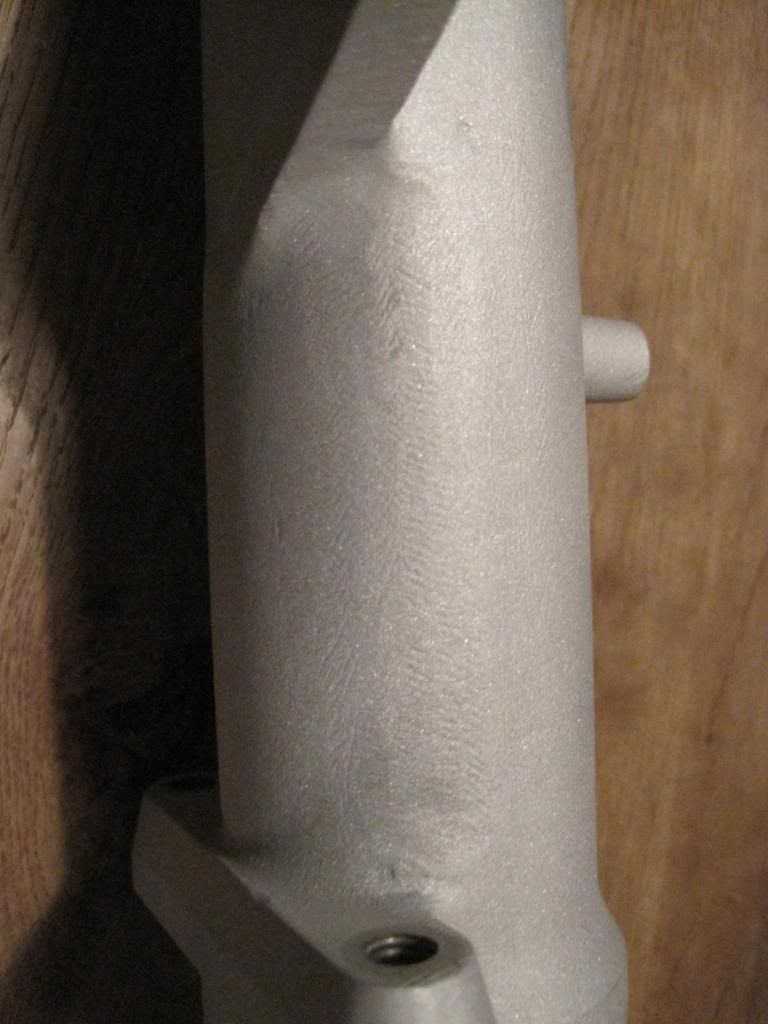
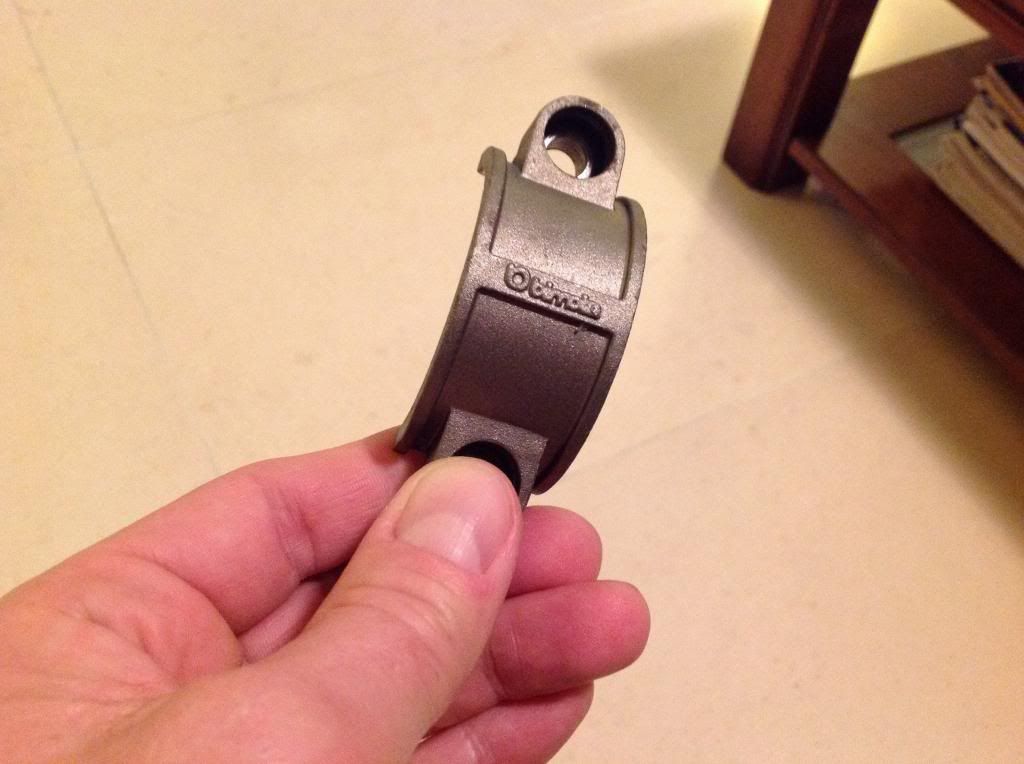
Frank
Have you got the hose clips that fit into the holes on the fork sliders (lower legs) for the SB? They fit into the lug in your first picture above
_________________
KB1x2, SB3 SB4 BB1 DB2 Vdue Evo YB11 RB1 Ducati MHR Suzi GS650 |
|
| Back to top |
|
|
2bims
Joined: 03 Apr 2010
Posts: 7289
|
| Posted: Fri Mar 07, 2014 10:44 am Post subject: |
|
|
| Are you needing some Nige.? I have a bag of rubber sleeved P Pipe clips for hoses if you need any...with a closed fixing lug for bolt fixing |
|
| Back to top |
|
|
Frank.61
Joined: 28 Nov 2013
Posts: 108
Location: Maasmechelen, Belgium
|
| Posted: Fri Mar 07, 2014 10:59 am Post subject: |
|
|
Hi Nige,
Not sure what you mean, but I do not have any hose clip, nor have I seen them (not in the parts list). 
My intention is to make one for myself (from stainless steel wire of 3 mm.).
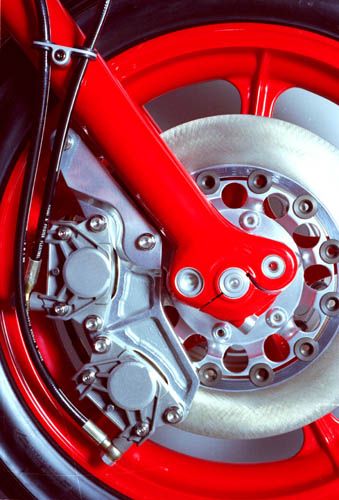
Here you see Tamburini's KB2 and he has made himself an aluminium clip/bracket for the brake lines. 
Could make a similar one but think it's a bit overkill (or not?)....
Mine will need only 1 eye (for the brake caliper).
But if anyone has a better proposal, Im open for all suggestions or comments!
By the way Nige, I got a sample on the red powder coat and it struck me that if you use car polish it actually rubs of (similar to normal red car paint).
How is that with yours?
The powder coater told me if I wanted to make it even more shiny (since powder coat would never achieve the deep gloss of normal car paint) I could use a little car polish (thats why I did it).
And since Keith has such a beautifull gloss red on his frames I have to try to come close
Assumed that it would not be possible to polish it like a regular car paint
..
Frank |
|
| Back to top |
|
|
2bims
Joined: 03 Apr 2010
Posts: 7289
|
|
| Back to top |
|
|
bimotanige
Joined: 12 Jul 2010
Posts: 582
Location: yorkshire
|
| Posted: Fri Mar 07, 2014 12:36 pm Post subject: |
|
|
2Bims, they are nice those on ebay
Frank, I spend more time riding and less time polishing , that's what I build them for.
_________________
KB1x2, SB3 SB4 BB1 DB2 Vdue Evo YB11 RB1 Ducati MHR Suzi GS650 |
|
| Back to top |
|
|
waggy

Joined: 26 Sep 2011
Posts: 277
Location: Northern Ireland
|
| Posted: Fri Mar 07, 2014 1:00 pm Post subject: |
|
|
I spend more time polishing and less time riding getting to be an old dog now  |
|
| Back to top |
|
|
Frank.61
Joined: 28 Nov 2013
Posts: 108
Location: Maasmechelen, Belgium
|
| Posted: Fri Mar 07, 2014 4:17 pm Post subject: |
|
|
| Well sofar I haven't done either of those |
|
| Back to top |
|
|
Evilchicken0

Joined: 12 May 2010
Posts: 2996
Location: London
|
|
| Back to top |
|
|
Frank.61
Joined: 28 Nov 2013
Posts: 108
Location: Maasmechelen, Belgium
|
| Posted: Wed Mar 19, 2014 12:24 pm Post subject: |
|
|
Hi all,
Busy doing some small activities but nothing mayor jet.
Nevertheless I send some pictures related to the preparations of the powder coating.
Have brought the swing arm and balancer to a chemical paint stripper.
This since I had done a small spot repair on the swing arm and wanted to sand all markings away before it will go to the powder coater (also the chain touched the swing arm and I want to remove these markings).
Having said so, chemical paint stripping is a wonderful process (also for aluminium) since it really leaves no markings or any other proof of the fact that it was ever painted (any paint goes off: powder coat or wet paint). 
Its just like a huge dish washer similar to the ones used in restaurants, just 10 times bigger.

A beautiful object d'art if you see the swing arm in the nude (can look at it for hours, what a work it must have been to make it nearly as complex as the frame)
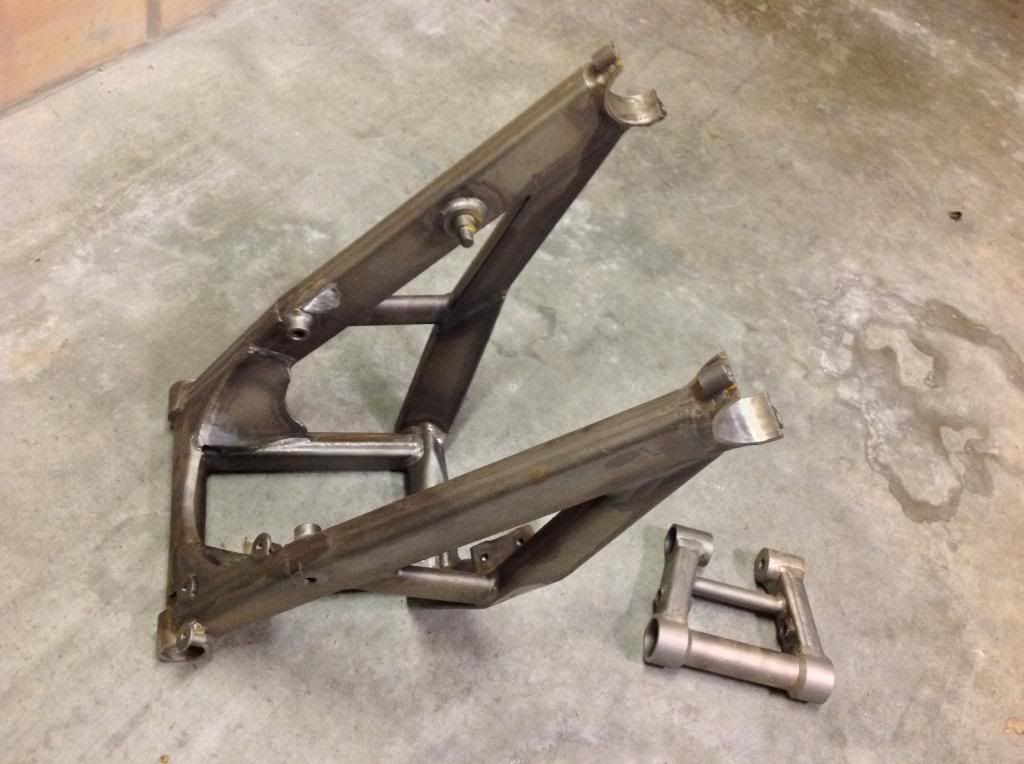
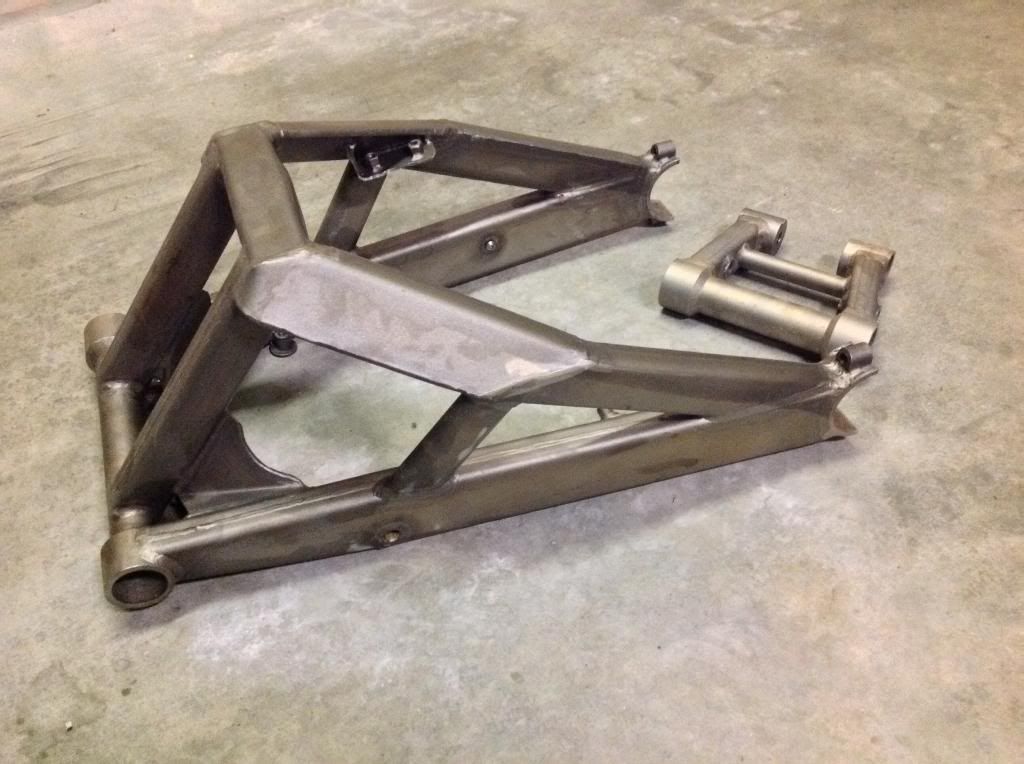
After having polished off all markings I will bring the frame and swing arm to my powder coater and it will receive a kind of epoxy primer and subsequently the final red coating layer.
By the way removing the bearings (in particular the steering bearings) was not as easy as I hoped: it took me a lot of force to remove those.
There was hardly any flesh to hit the outer bearing race from behind.
Wonder if others with the steel frames have similar experience?
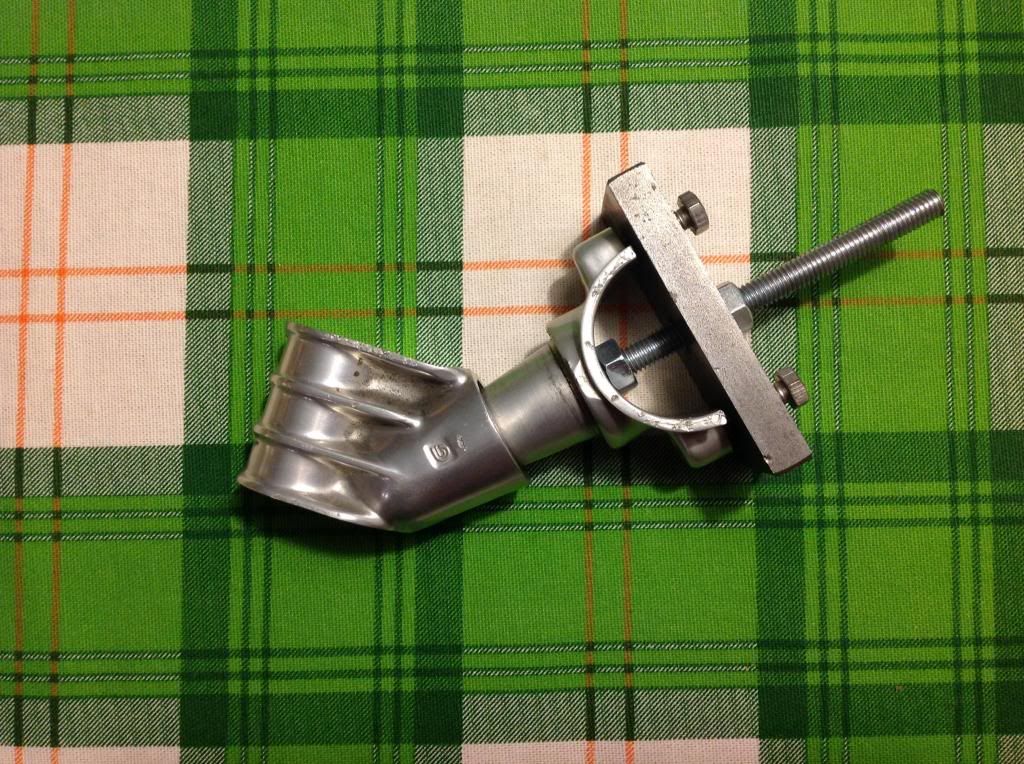
Will make a separate topic on the restoration of the clip-on's (once fully restored with beautiful polished Stainless Steel tubes) but wanted to give you a picture of my self made puller (they were really jammed). 
Ciao,
Frank |
|
| Back to top |
|
|
2bims
Joined: 03 Apr 2010
Posts: 7289
|
| Posted: Wed Mar 19, 2014 12:44 pm Post subject: |
|
|
Looking good Frank...and I'm loving the green tartan backdrop...didnt realise you were from the McTavish Clan.........
I'd be interested to know how you got the clip on tubes out of the clip ons....as I'd like to change out mine also on the Db1...plain steel with flakey chrome...at least on one side...and its a bit "bent" so SS tubing would be the way to go........ |
|
| Back to top |
|
|
Mike Jennings
Joined: 22 Mar 2008
Posts: 286
Location: England
|
| Posted: Wed Mar 19, 2014 12:45 pm Post subject: |
|
|
Hello Frank,
it can help to run a weld bead along the inside face of a steering head bearing outer race if you're trying to remove it. When the weld cools it shrinks the race to ease removal, although re-use of the bearing's not recommended!
Cheers, MikeJ |
|
| Back to top |
|
|
Frank.61
Joined: 28 Nov 2013
Posts: 108
Location: Maasmechelen, Belgium
|
| Posted: Wed Mar 19, 2014 2:22 pm Post subject: |
|
|
Hi Steve,
No I'm from the Mc Greenfromjealousy clan !!
Seeing all those B's being restored to perfection in seemingly no time (N, K and you)!
No seriously, table cloth is from Italy (honestly, bought it in Como).
I will make a topic on the clip-on's with all details in.
Mine was bent (right-side) as result of a fall) as also the chrome was far from perfect (and it is in direct view).
Former owners have apparently tried to rectify it and have put the aluminium clamps in a bench vice, which predictably resulted in marked/damaged aluminium parts 
So: first get those tubes out of the aluminium "part" which is easy if you use a simple hydraulic press and a socket (diameter smaller then the 22 mm. of the tube).
You do not have to use anything else and they come out completely undamaged. 
if you want, you could heat her up a little with a butane or propane torch, but be careful since aluminium doesn't warn when it is to hot (no discoloration to warn you).
Again can give you all pics you want (PM me if so) and it is really easy!
I will de-anodize the parts (by a professional company not yet done) then polish them and have them anodized again and afterwards the Stainless Steel tubes pressed in (did cost me 70 euro's delivered for the 2 SS tubes from D-R-T- Armin Schneider directly not via eBay
.. not to much I think).
If I can do anything let me know (IOY big time)!
Frank |
|
| Back to top |
|
|
|


