 |
Bimota Forum
Forum for Bimota Owners and Riders
|
| View previous topic :: View next topic |
| Author |
Message |
djt77
Joined: 27 Feb 2008
Posts: 413
Location: Perth, Western Australia
|
 Posted: Fri Nov 17, 2017 2:21 am Post subject: Posted: Fri Nov 17, 2017 2:21 am Post subject: |
 |
|
| Can't wait for this to be finished. How much longer do you think Gavin? |
|
| Back to top |
|
 |
Gavin944888
Joined: 29 Jan 2014
Posts: 572
Location: Essex....way South of Scotland
|
| Posted: Mon Nov 20, 2017 2:15 pm Post subject: |
|
|
.
Hello..........things move on ....and as the fabrication takes place the carbon body panel sourcing is now complete....and some are available to whoever.
 IMG_0534 by Gavin Robertson, on Flickr IMG_0534 by Gavin Robertson, on Flickr
Front DB7 carbon mudguard surplus to requirements and brand new...available at £200 plus post.
 IMG_0535 by Gavin Robertson, on Flickr IMG_0535 by Gavin Robertson, on Flickr
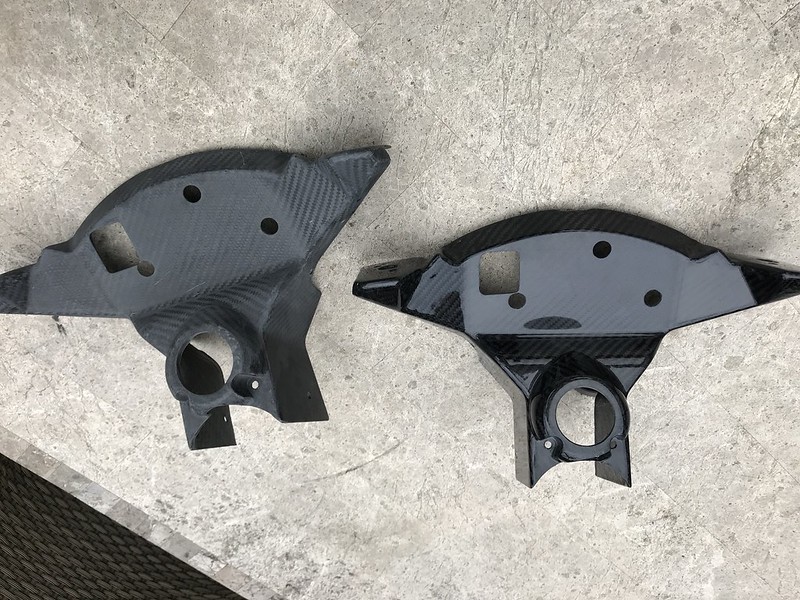
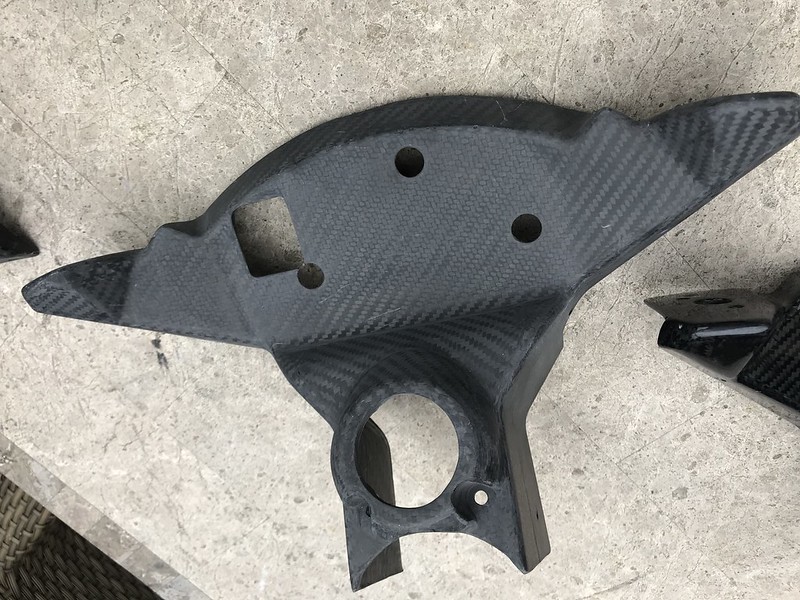
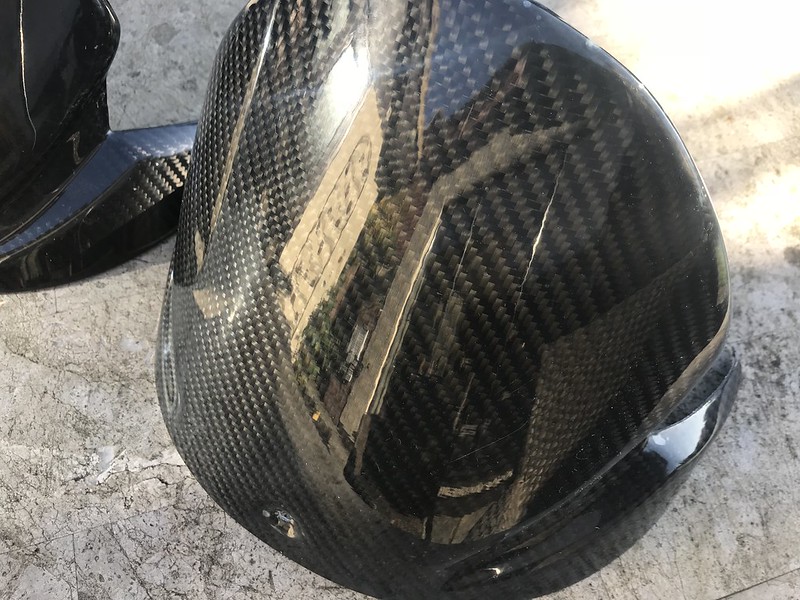
The worlds most expensive fairing /dash support and its' cheaper brother
 IMG_0536 by Gavin Robertson, on Flickr IMG_0536 by Gavin Robertson, on Flickr
I paid over 650 euro excluding shipping for the shiny one and set about sourcing the actual maker in Italy......a lot cheaper but needs some lacquer
 IMG_0537 by Gavin Robertson, on Flickr IMG_0537 by Gavin Robertson, on Flickr
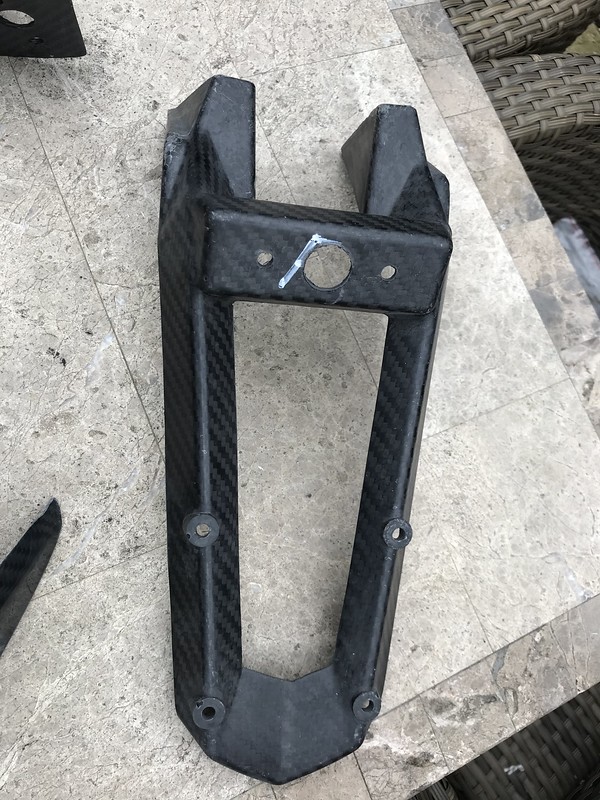
The rear mudguard ...the same one that is on the DB7-8-9 and DB11 VLX.
 IMG_0528 - Copy by Gavin Robertson, on Flickr IMG_0528 - Copy by Gavin Robertson, on Flickr
I bought a batch of 3 (to drive the price down)...£165 plus postage ....OEM over 385 euro each (no shipping!)
I do not want to let seem like an advert BUT over the build I have acquired from various sources items some I will use.
Sometimes bought 3 off when I only needed 1off and some which I planned to use but then changed my mind the real thing turned up!
So here are the images and basically whatever is left over will be placed up for sale.
 IMG_0538 by Gavin Robertson, on Flickr IMG_0538 by Gavin Robertson, on Flickr
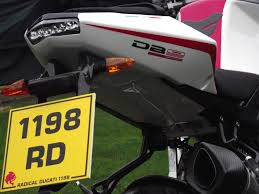
Above is the virtually extinct Bimota rear number plate assembly which replaced this planned alternative
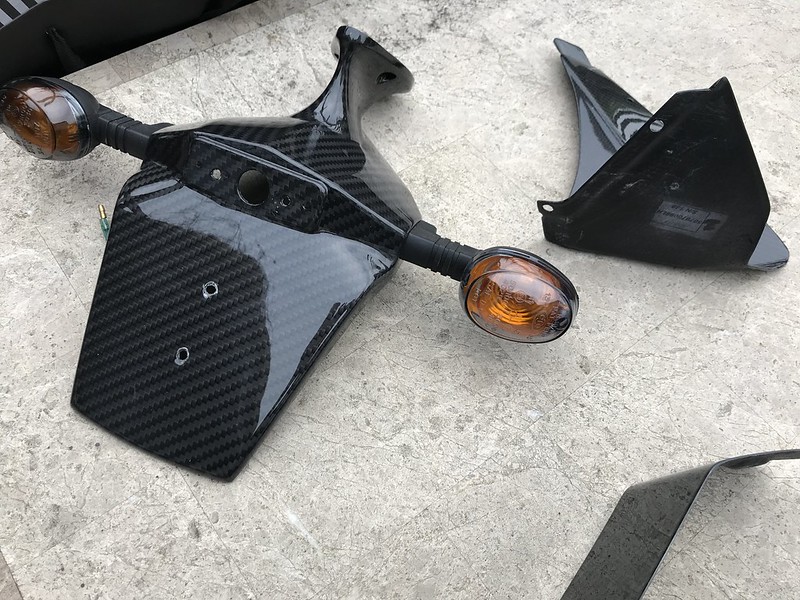 IMG_0540 by Gavin Robertson, on Flickr IMG_0540 by Gavin Robertson, on Flickr
An OEM unit from a SB 8 version complete with smoke indicators sourced from the USA....so it is also available for sale
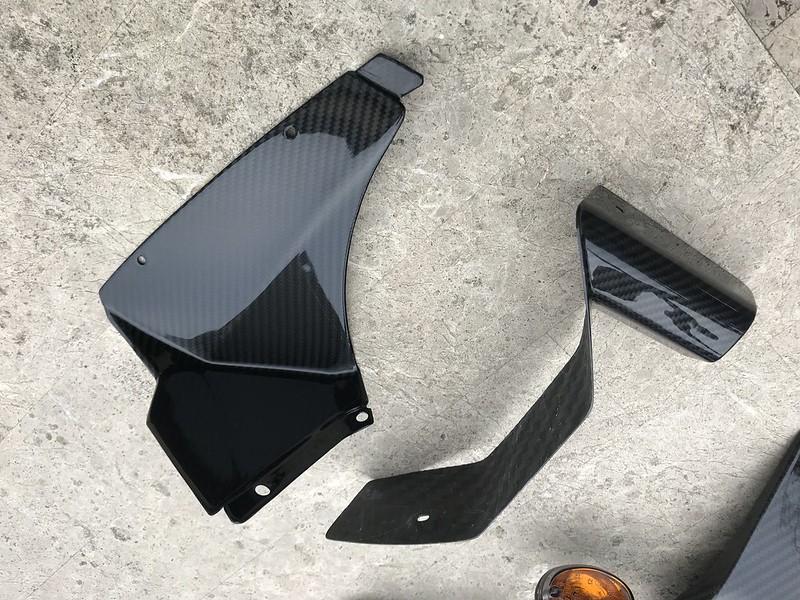 IMG_0539 by Gavin Robertson, on Flickr IMG_0539 by Gavin Robertson, on Flickr
 IMG_0541 by Gavin Robertson, on Flickr IMG_0541 by Gavin Robertson, on Flickr
Above are a set of fairing infill panel and a lower chain and rear mudguard section .....one brand new one NOS sourced from San Marino
 IMG_0543 by Gavin Robertson, on Flickr IMG_0543 by Gavin Robertson, on Flickr
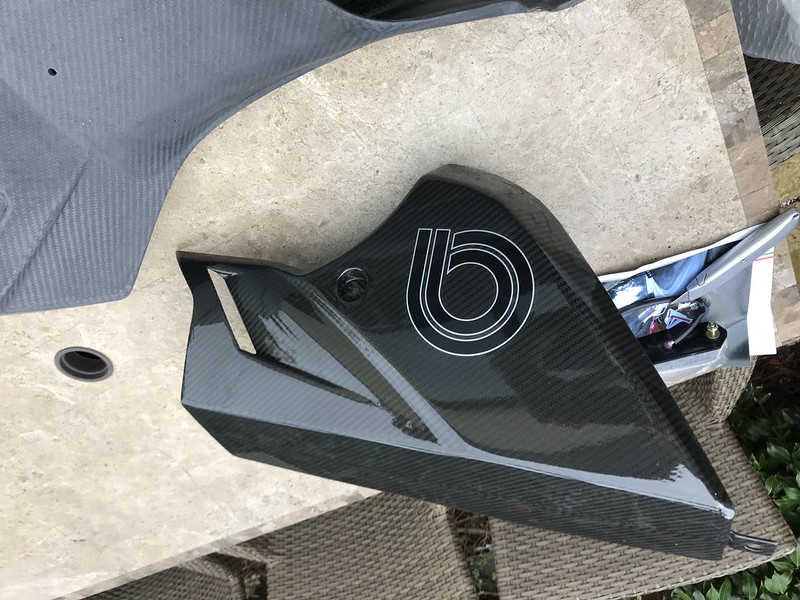
Above is OEM NOS quality control failed belly pan......someone managed to crease the B then lacquered over it!!
Then....the most expensive item....over 4200 euro from Bimota albeit when finished and painted..this cost me 2000 euro
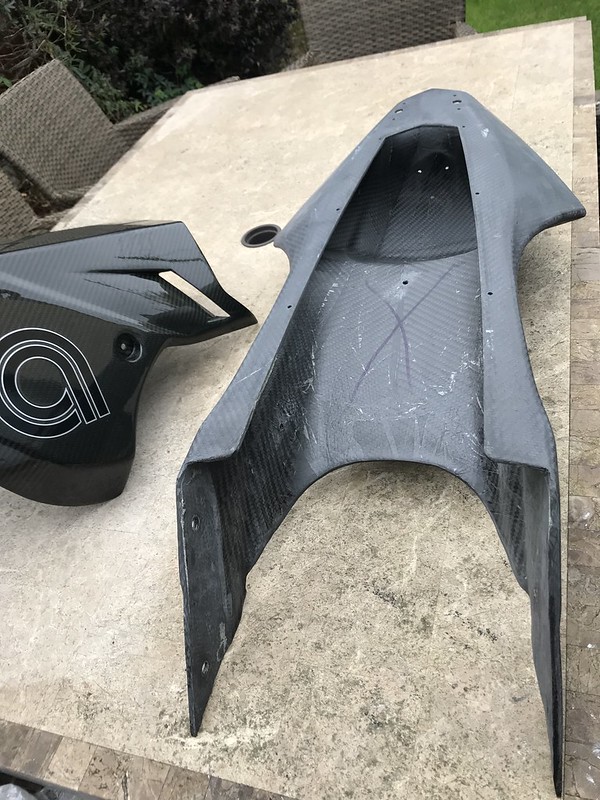 IMG_0544 by Gavin Robertson, on Flickr IMG_0544 by Gavin Robertson, on Flickr
This one is finished but not lacquered........trying to cover my costs at £1800 plus postman pat!
 IMG_0542 by Gavin Robertson, on Flickr IMG_0542 by Gavin Robertson, on Flickr
I placed an order (with the factory) and paid for the side subframes as used on the DB11.....hence the reason for selling the DB7 carbon seat.
These never turned up.... along with various wiring bits and the handlebar clamps.....so I changed direction.
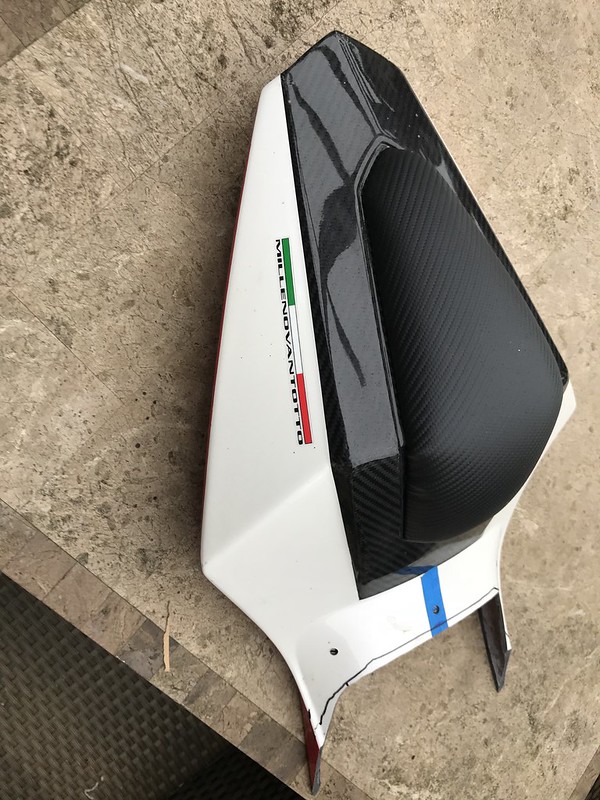
My mate; Tony the Paint ...likes the DB9S carbon and wants the longer tail section as per my DB9...so it 'may' be for sale or not depending on him sourcing a DB9S carbon
 XPD6 by Gavin Robertson, on Flickr XPD6 by Gavin Robertson, on Flickr
And I have fabricated the alloy rear subframe using my DB9 as a model and plan to use this I have lying about in the garage
 IMG_0545 by Gavin Robertson, on Flickr IMG_0545 by Gavin Robertson, on Flickr
 IMG_0546 by Gavin Robertson, on Flickr IMG_0546 by Gavin Robertson, on Flickr
So there you have it....the body work is going on....BUT
some OEM stuff is excess and I still have not decided if we use the Walbro ECU and Bimota DB7 wiring (probably more expensive than gold) or the BIMOTA electronic stuff including a new DB7 Dash.
 IMG_0093 by Gavin Robertson, on Flickr IMG_0093 by Gavin Robertson, on Flickr
I really like the DB7 dash as it matches the DB7 mule .....however that flatscreen thing on the DB11 VLX is something else.....and if I raise enough cash back from all other bits...who knows.
Back soon with updates on Pulley arrangements ...a bit like flower arranging but no foliage......the seat assembly and everything in place
And maybe...maybe I would have signed off on the electrics....have I told you that ...I hate electrics?
regards
Gavin
_________________
On an Island in the River Thames!
Cagiva Elefant 888/955 & adventure sidecar
Cagiva Elefant 999r engined
Cagiva BIMOTA Motard Concept
BIMOTA DB9 (with DB11 rear-end)
BIMOTA DB7-11 VLX MULE (build coming to an end)
BIMOTA DB11 VLX Supercharger |
|
| Back to top |
|
|
Gavin944888
Joined: 29 Jan 2014
Posts: 572
Location: Essex....way South of Scotland
|
| Posted: Mon Nov 20, 2017 3:30 pm Post subject: |
|
|
.
DJT77
All the bits will be on except the wiring and it will be ready by Xmas.
I lost 6 weeks due to the first wiring disaster and I want to make the correct decision this time.
The guy I am using is finishing off Triumph to some Shiek (50K) conversion a kind of Lawrence of Arabia bike with massive single headlamp and a speed as per the Vincent.
After that, mine is one the bench....it is just whether we run it up without the Supecharger and set up or use my DB9 as base setting and rewrite a programme with the proposed uplift.
Should see the light of day after all the Dyno runs before the race season starts here in March
regards
Gavin
_________________
On an Island in the River Thames!
Cagiva Elefant 888/955 & adventure sidecar
Cagiva Elefant 999r engined
Cagiva BIMOTA Motard Concept
BIMOTA DB9 (with DB11 rear-end)
BIMOTA DB7-11 VLX MULE (build coming to an end)
BIMOTA DB11 VLX Supercharger |
|
| Back to top |
|
|
Gavin944888
Joined: 29 Jan 2014
Posts: 572
Location: Essex....way South of Scotland
|
| Posted: Mon Nov 27, 2017 12:59 pm Post subject: |
|
|
.
So.....things crack on at a fair pace and after the carbon bodywork comes the seat subframe and various other bits of machining.
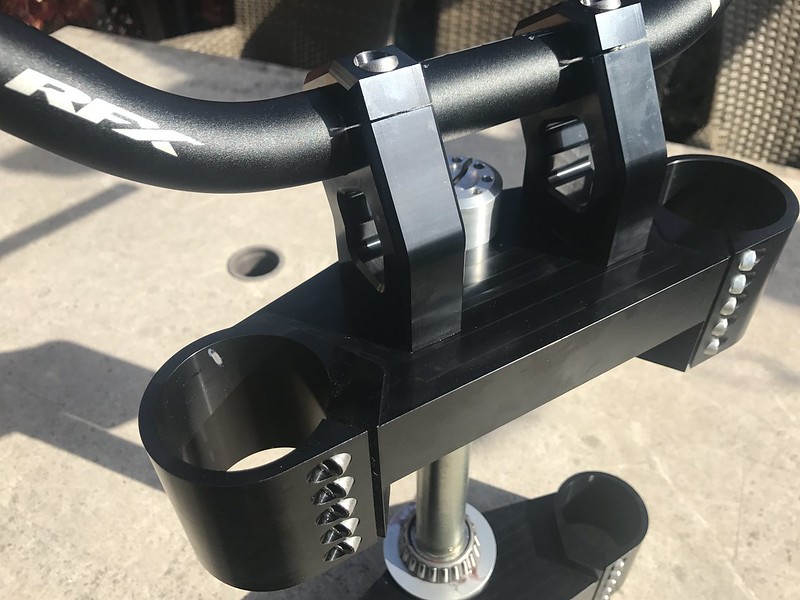
Being big boned (bless) bars and pegs have to be extended in length and width.
So another 55mm was added to each side of the bars and the footpegs got 45mm extensions to suit my size 11 club feet (pins in both ankles!)
 IMG_0525 by Gavin Robertson, on Flickr IMG_0525 by Gavin Robertson, on Flickr
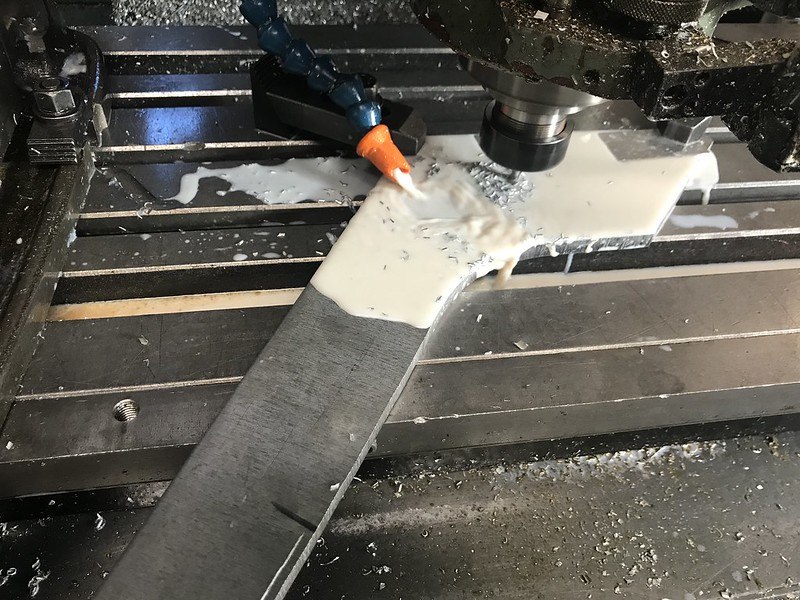
Some 10mm thick alloy plate was sourced and the template from the DB9 was drawn onto the sheet.
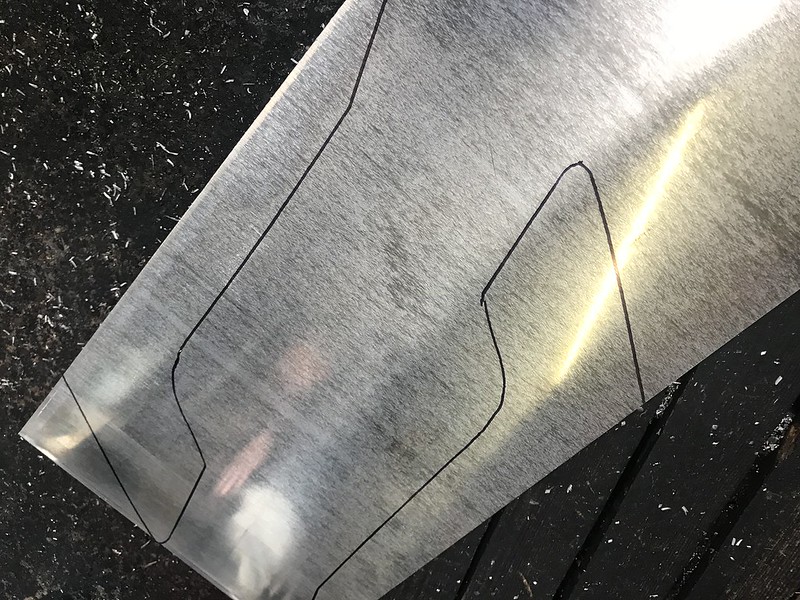 IMG_0554 by Gavin Robertson, on Flickr IMG_0554 by Gavin Robertson, on Flickr
The sheet was taken to the band saw and shaped to suit.
 IMG_0557 by Gavin Robertson, on Flickr IMG_0557 by Gavin Robertson, on Flickr
Before going on the mill where the side plates had 6mm wide by 6mm deep slots cut into the surface to aid the bending to shape.
 IMG_0555 by Gavin Robertson, on Flickr IMG_0555 by Gavin Robertson, on Flickr
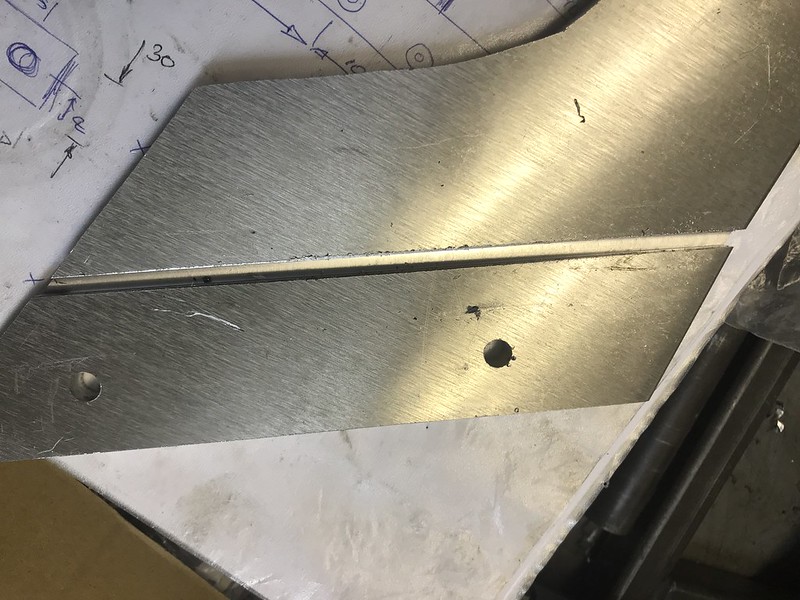 IMG_0560 by Gavin Robertson, on Flickr IMG_0560 by Gavin Robertson, on Flickr
Nothing could be finalized until the tank was finally positioned to clear the air box .
Which in turn mean spaces 20 mm thick being attached to the rear section of the tank support.
 IMG_0553 by Gavin Robertson, on Flickr IMG_0553 by Gavin Robertson, on Flickr
Once the alloy had been bent to shape it could be offered up to see how the seat unit sat.
 IMG_0559 by Gavin Robertson, on Flickr IMG_0559 by Gavin Robertson, on Flickr
Once everything was basically in the correct area....detailing could start and the milling machine put to good use.
_________________
On an Island in the River Thames!
Cagiva Elefant 888/955 & adventure sidecar
Cagiva Elefant 999r engined
Cagiva BIMOTA Motard Concept
BIMOTA DB9 (with DB11 rear-end)
BIMOTA DB7-11 VLX MULE (build coming to an end)
BIMOTA DB11 VLX Supercharger |
|
| Back to top |
|
|
Gavin944888
Joined: 29 Jan 2014
Posts: 572
Location: Essex....way South of Scotland
|
| Posted: Mon Nov 27, 2017 4:01 pm Post subject: |
|
|
.
Still getting used to this posting malarky......hitting the buttons before I am finished.
Anyway there was a couple of bits of finishing required on the Oil Cooler and yokes.
The forks were capped off by these....I will do some detailing latter on before anodizing
 IMG_0550 by Gavin Robertson, on Flickr IMG_0550 by Gavin Robertson, on Flickr
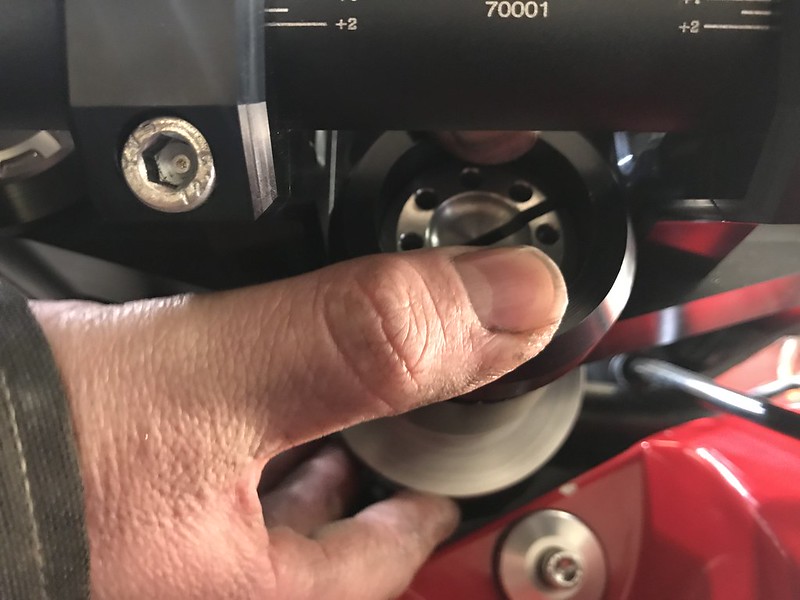
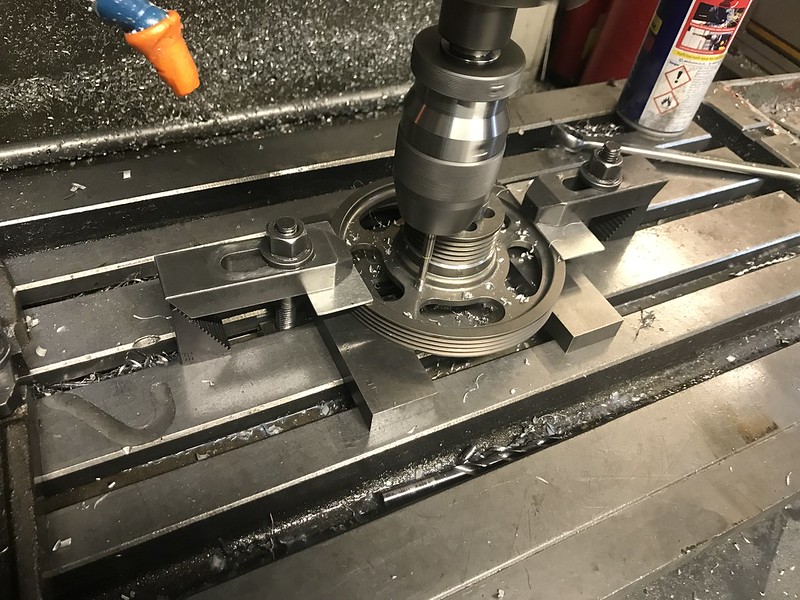
Over and above this the side pulley assembly had to be spaced and machined.
The supercharger had been fixed and lines drawn down to help locate the final position of the pullies.
The main cluth pulley coming off of the layshaft was mounted to the outboard and the supercarger puller to the inboard.
 IMG_0551 by Gavin Robertson, on Flickr IMG_0551 by Gavin Robertson, on Flickr
Additional adjustment was achieved by machining new belt grooves in the outboard pulley allowing the belt to be postioned on the best suited grooves rather than those available.
This is the position BEFORE adding additional groves and it looks out there...not finished
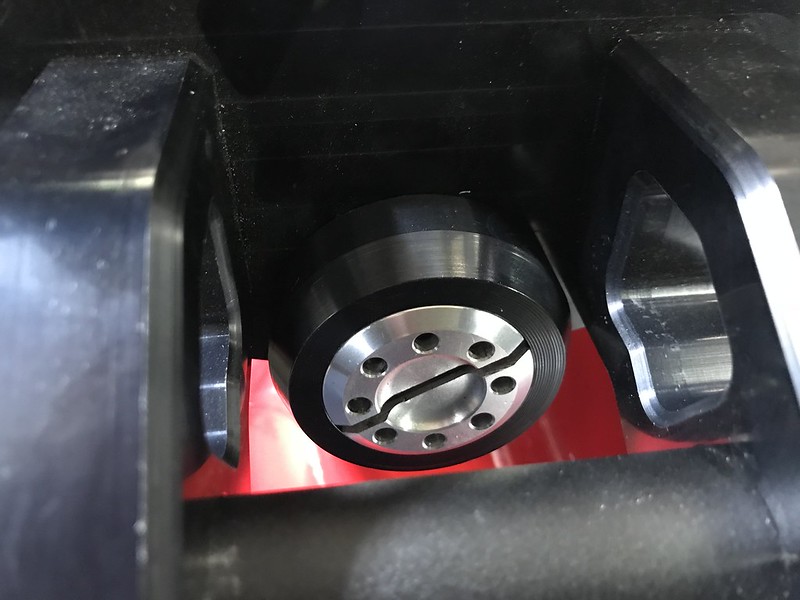
By adding more grooves the large Superchargered pulley could be let into the pulley cover giving a very snug apperance.
 IMG_0552 by Gavin Robertson, on Flickr IMG_0552 by Gavin Robertson, on Flickr
Not finished.... but the pulley supports are being mounted and extensions fabricated and the bearings for the large pulley are mounted in and behind the sideplate.
The centres were located before the sideplate was removed and set up on the Milling machine for finishing.
As the machining is reaching an end, the airbox is being blasted, ceracoted, then blasted on the outside again prior to heat resistance crinkle finish being applied....more images soon.
regards
Gavin
_________________
On an Island in the River Thames!
Cagiva Elefant 888/955 & adventure sidecar
Cagiva Elefant 999r engined
Cagiva BIMOTA Motard Concept
BIMOTA DB9 (with DB11 rear-end)
BIMOTA DB7-11 VLX MULE (build coming to an end)
BIMOTA DB11 VLX Supercharger |
|
| Back to top |
|
|
Gavin944888
Joined: 29 Jan 2014
Posts: 572
Location: Essex....way South of Scotland
|
| Posted: Tue Dec 05, 2017 2:47 pm Post subject: |
|
|
Hello..again!
Right, I have decided (well actually the electronics guy has decided) that the chosen route is a MICROTEC ECU and a custom built wiring loom.
It appears that the version chosen of ECU is capable of working normally asperated and also superchargered engines.
We will be building a normally asperated bike with the air coming through the torturist airbox design but with the supercharger removed and just a hole where it used to be.
The base settings and ECU will work on a 'best case scenario' before retro fiting the Supercharger.
This should give us before and after (supercharger) values and although the before will be compared to a standard DB9 settings.
It is the engine from the DB9 (Ducati Diavel 1198) that is being used rather than the 1098 dry clutch unit as fitted to the DB7(this is what BIMOTA did)
Now that the decision has been made, all my redundant OEM BIMOTA wiring loom, ECU and Dash are going up for sale.
The bike will not be heading to the test rig until the end of January 2018
So ........next posting will include some more images and general update as all other things are now at a standstill.
regards
Gavin
_________________
On an Island in the River Thames!
Cagiva Elefant 888/955 & adventure sidecar
Cagiva Elefant 999r engined
Cagiva BIMOTA Motard Concept
BIMOTA DB9 (with DB11 rear-end)
BIMOTA DB7-11 VLX MULE (build coming to an end)
BIMOTA DB11 VLX Supercharger |
|
| Back to top |
|
|
Gavin944888
Joined: 29 Jan 2014
Posts: 572
Location: Essex....way South of Scotland
|
| Posted: Wed Dec 13, 2017 11:46 am Post subject: |
|
|
It gets a bit depressing when you are waiting for other folk to complete their section of the build.
But I have uncovered some new images of the sections covered so far and a bit of detailing.
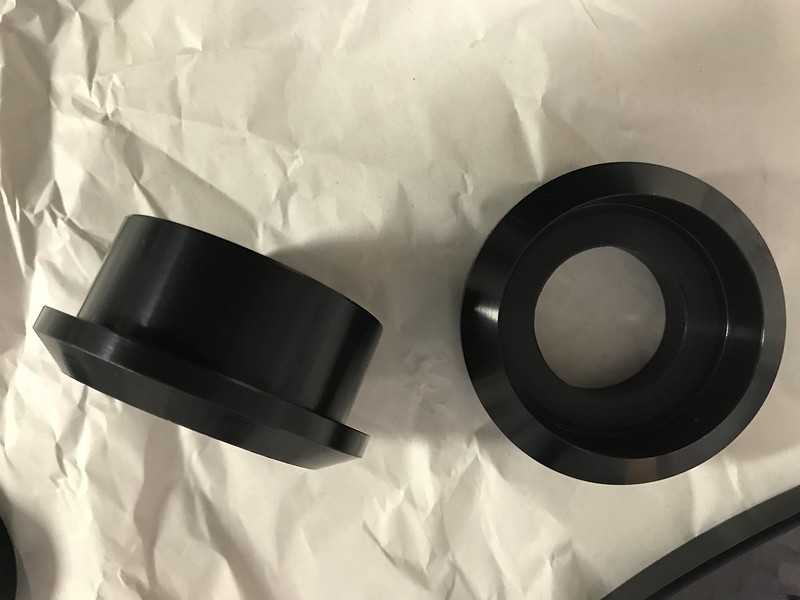
The fork caps were a bit basic and I really wanted to copy the detail carried out on the DB9 but I could not find what I wanted.
So quick search on the tin tin net and I found these little reservoir covers for under £10.00 delivered!
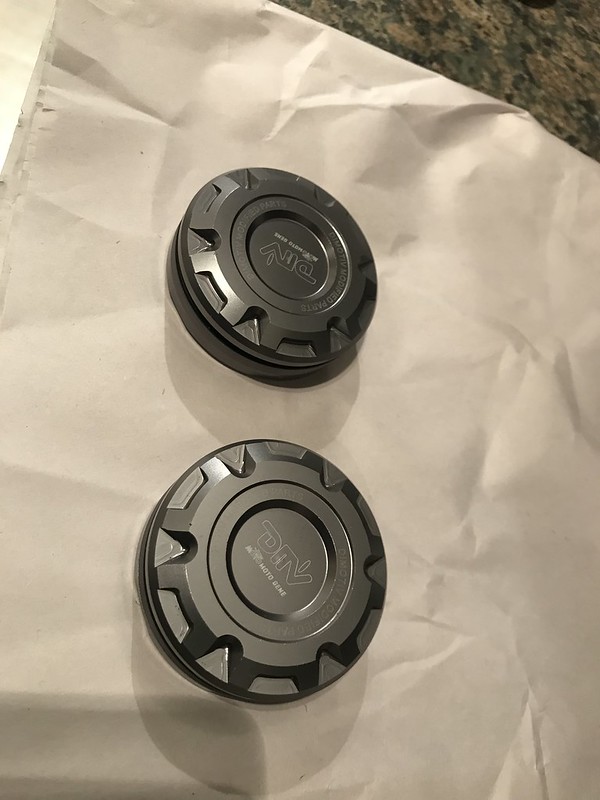 IMG_0587 by Gavin Robertson, on Flickr IMG_0587 by Gavin Robertson, on Flickr
I took the original caps and counter bored them to suit
IMG_0550 by Gavin Robertson, on Flickr
Like this and then anodized them along with some other items for detailing.
 IMG_0586 by Gavin Robertson, on Flickr IMG_0586 by Gavin Robertson, on Flickr
 IMG_0580 by Gavin Robertson, on Flickr IMG_0580 by Gavin Robertson, on Flickr
Stuck them in an oven to get them to expand and pressed the sections together
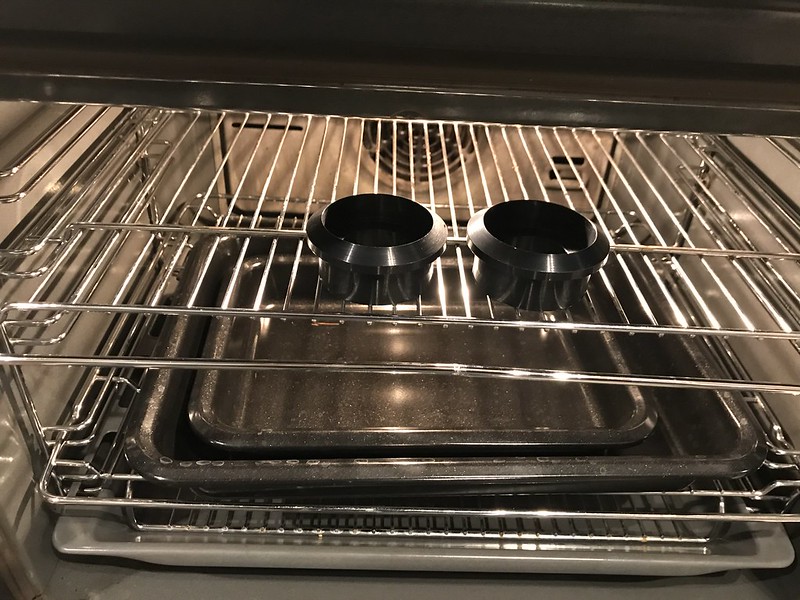 IMG_0592 by Gavin Robertson, on Flickr IMG_0592 by Gavin Robertson, on Flickr
 IMG_0590 by Gavin Robertson, on Flickr IMG_0590 by Gavin Robertson, on Flickr
 IMG_0600 by Gavin Robertson, on Flickr IMG_0600 by Gavin Robertson, on Flickr
From this ...to this
 IMG_0601 by Gavin Robertson, on Flickr IMG_0601 by Gavin Robertson, on Flickr
 IMG_0602 by Gavin Robertson, on Flickr IMG_0602 by Gavin Robertson, on Flickr
It would have cost a lot more to machine anything similar or to lose the 'blocky effect' of the plain caps.
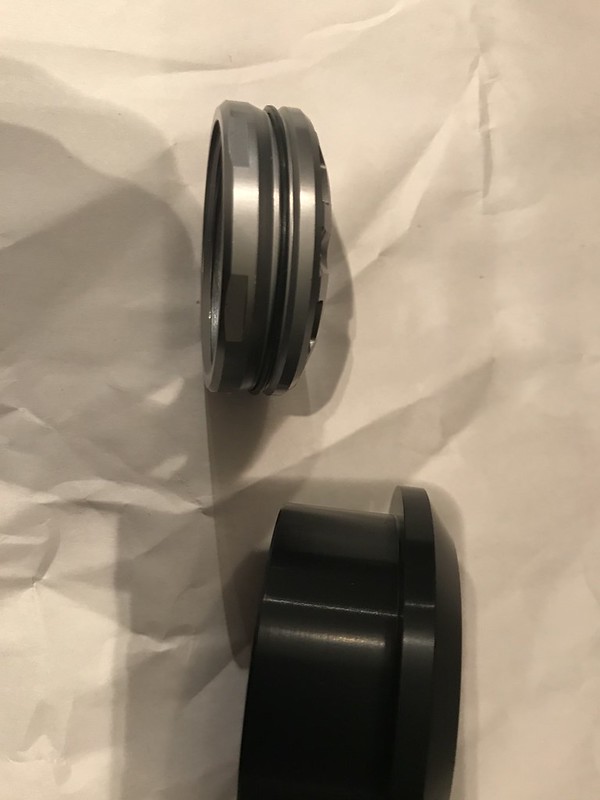
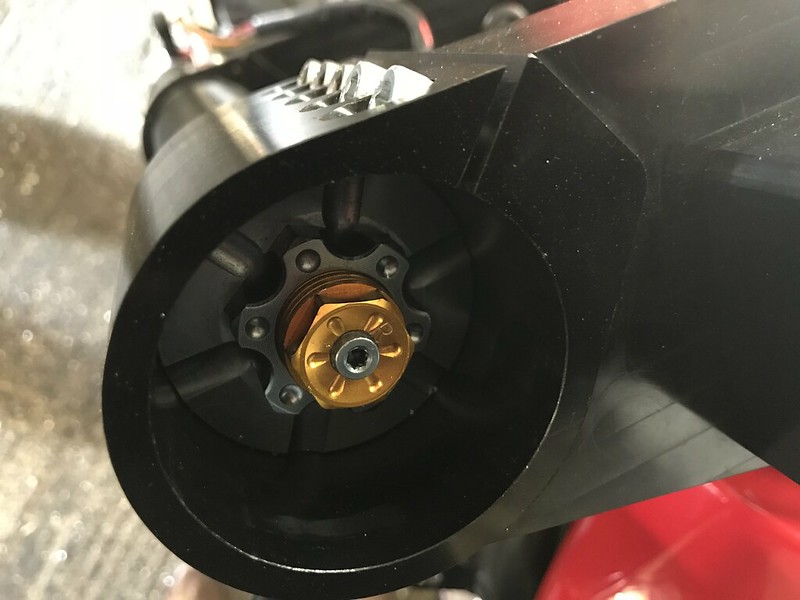
In addition there was the pinch nut detail........here it is before.
 IMG_0456 by Gavin Robertson, on Flickr IMG_0456 by Gavin Robertson, on Flickr
 IMG_0604 by Gavin Robertson, on Flickr IMG_0604 by Gavin Robertson, on Flickr
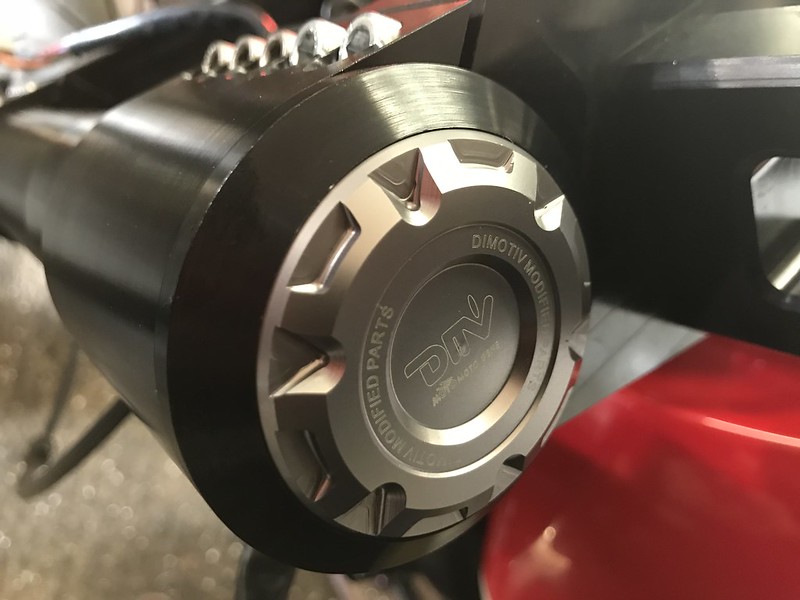
To this.............the anodized section with a push fit
 IMG_0605 by Gavin Robertson, on Flickr IMG_0605 by Gavin Robertson, on Flickr
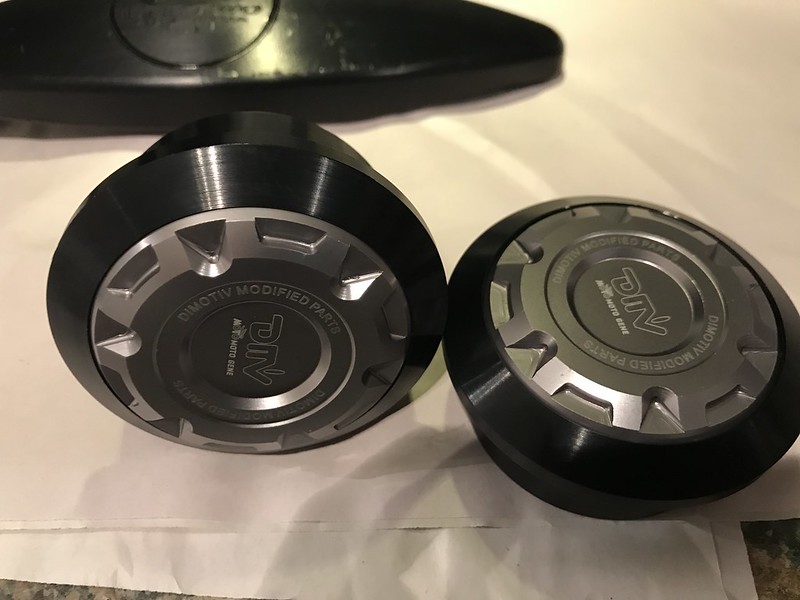
To this... finished item
 IMG_0606 by Gavin Robertson, on Flickr IMG_0606 by Gavin Robertson, on Flickr
and complete with finger prints ....really needs a wipe down with an oily rag.
 IMG_0607 by Gavin Robertson, on Flickr IMG_0607 by Gavin Robertson, on Flickr
_________________
On an Island in the River Thames!
Cagiva Elefant 888/955 & adventure sidecar
Cagiva Elefant 999r engined
Cagiva BIMOTA Motard Concept
BIMOTA DB9 (with DB11 rear-end)
BIMOTA DB7-11 VLX MULE (build coming to an end)
BIMOTA DB11 VLX Supercharger |
|
| Back to top |
|
|
Gavin944888
Joined: 29 Jan 2014
Posts: 572
Location: Essex....way South of Scotland
|
| Posted: Wed Dec 13, 2017 12:21 pm Post subject: |
|
|
.
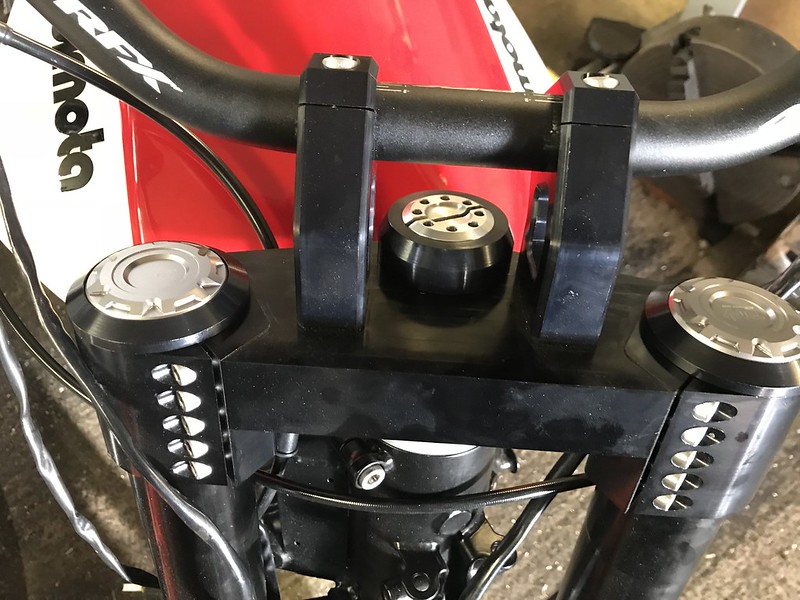
The forks and top yoke are now complete and it is just a matter of fitting the ignition switch and finish.
 Untitled by Gavin Robertson, on Flickr Untitled by Gavin Robertson, on Flickr
The Ducati master cylinders from the Diavel were a bit 'shouty' but I have to tip a nod to the Ducati design ......but find something bimota....ish
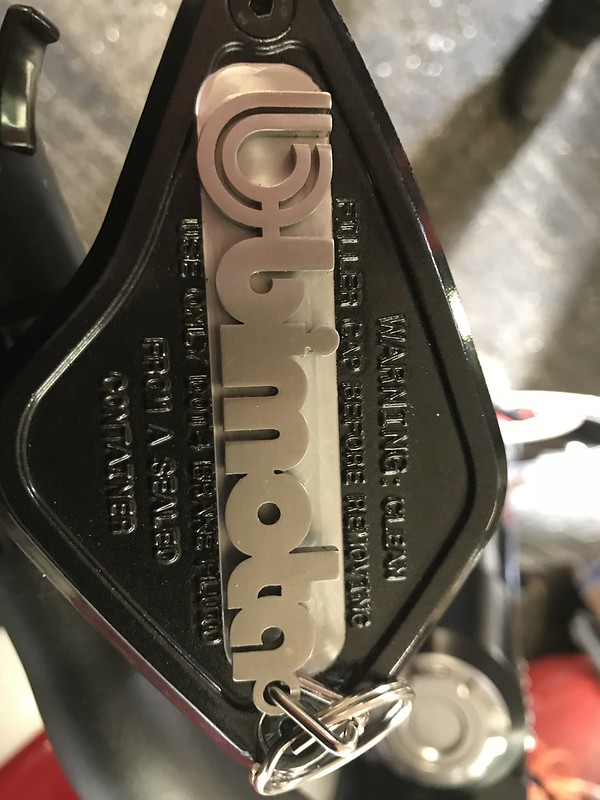
I tried with the fork caps to incorporate the Bimota 'B' but to no avail....so some key rings were sourced and set upon.
 IMG_0609 by Gavin Robertson, on Flickr IMG_0609 by Gavin Robertson, on Flickr
The caps were machined to take off the DUCATI
These were found...stainless steel laser cut..and they fit better than the photo shows....once they were dressed up on the linisher.
 IMG_0610 by Gavin Robertson, on Flickr IMG_0610 by Gavin Robertson, on Flickr
Dropped into the machined slot prior to going to the powder coating company with all the other stuff.
 IMG_0608 by Gavin Robertson, on Flickr IMG_0608 by Gavin Robertson, on Flickr
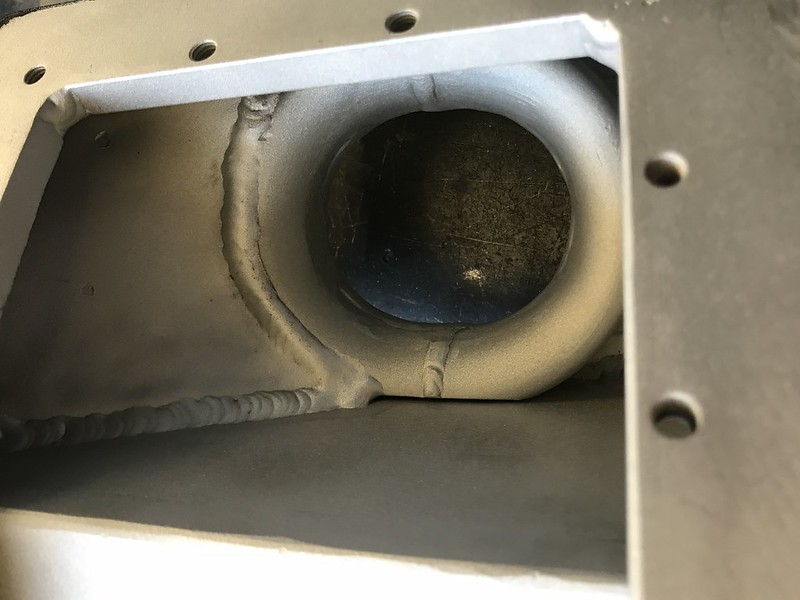
The airbox was taken and machined flat....then stripped of all the sensors.
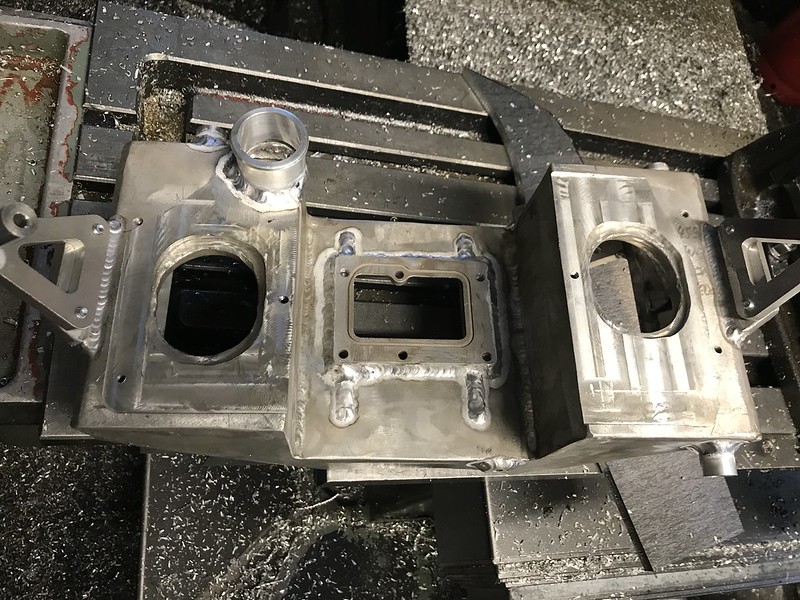 IMG_0571 by Gavin Robertson, on Flickr IMG_0571 by Gavin Robertson, on Flickr
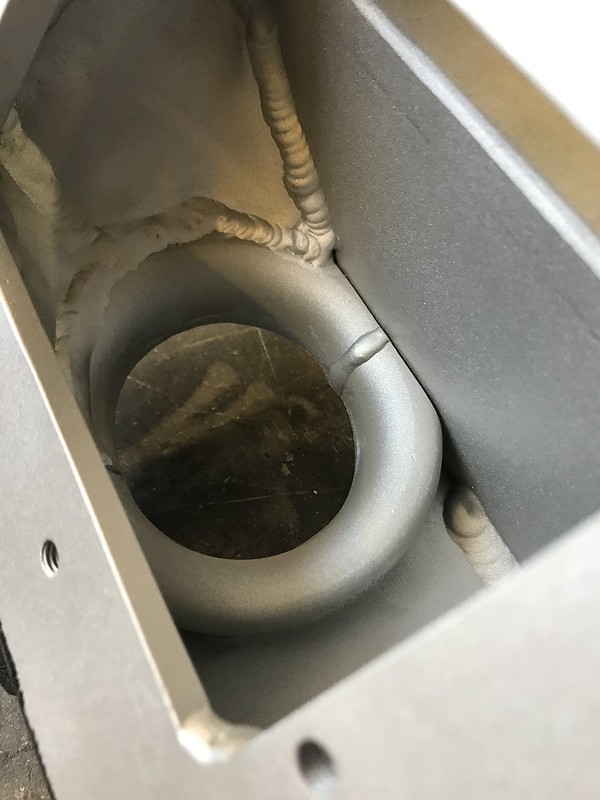
The lids were positioned and welded to suit
 IMG_0576 (1) by Gavin Robertson, on Flickr IMG_0576 (1) by Gavin Robertson, on Flickr
Before being blast cleaned and coated.
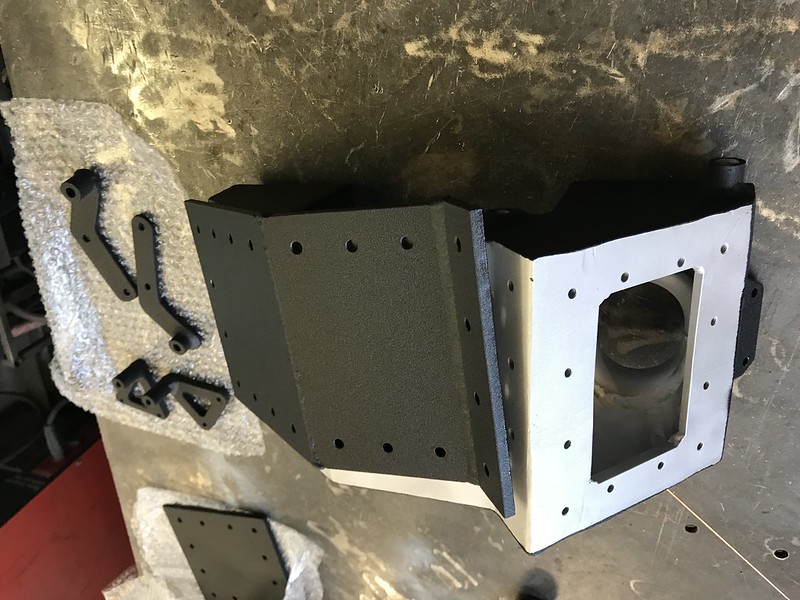
 IMG_0614 by Gavin Robertson, on Flickr IMG_0614 by Gavin Robertson, on Flickr
 IMG_0615 by Gavin Robertson, on Flickr IMG_0615 by Gavin Robertson, on Flickr
The powder coating company masked off all the areas for mating and blasted and 'crinkle cut' coated the finish.
 IMG_0612 by Gavin Robertson, on Flickr IMG_0612 by Gavin Robertson, on Flickr
The masking was need to keep the mating surfaces and o ring sealing slots intact.
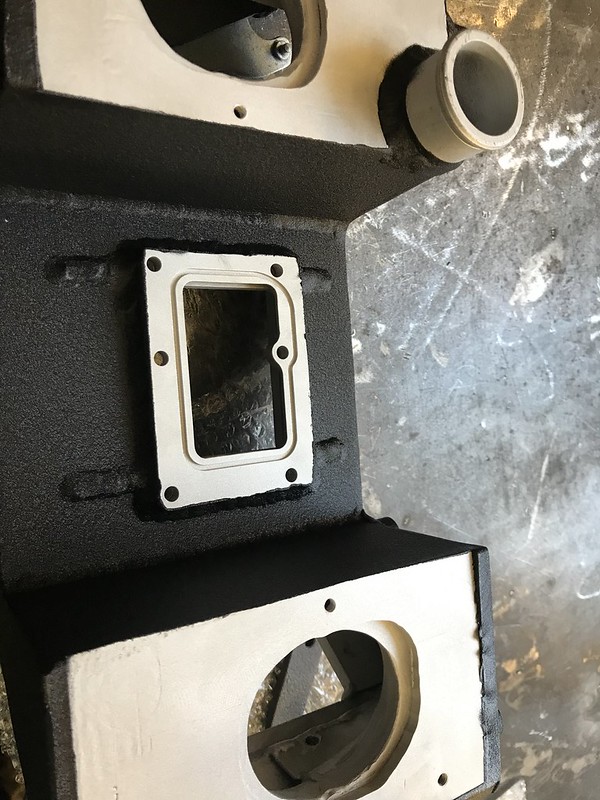 IMG_0616 by Gavin Robertson, on Flickr IMG_0616 by Gavin Robertson, on Flickr
 IMG_0617 by Gavin Robertson, on Flickr IMG_0617 by Gavin Robertson, on Flickr
Once everything was collected.........it all just needs tidying up prior to gasket cutting.
 IMG_0613 by Gavin Robertson, on Flickr# IMG_0613 by Gavin Robertson, on Flickr#
The belt drive section has also been finished and I am awaiting some belt tension information.........more forums and explaining what I am doing.
The seat section is the last area which is being worked on..........although I am toying whether to go 2 into 2 exhausts as per my original sketch.
We will see.......
Next images will show the supercharger fitted and complete along with oil cooler and other odds and sods.
Xmas is coming
regards
Gavin.
_________________
On an Island in the River Thames!
Cagiva Elefant 888/955 & adventure sidecar
Cagiva Elefant 999r engined
Cagiva BIMOTA Motard Concept
BIMOTA DB9 (with DB11 rear-end)
BIMOTA DB7-11 VLX MULE (build coming to an end)
BIMOTA DB11 VLX Supercharger |
|
| Back to top |
|
|
welshlamb

Joined: 09 Mar 2011
Posts: 592
Location: South Wales , Nr. Abergavenny
|
| Posted: Wed Dec 13, 2017 5:39 pm Post subject: |
|
|
Gavin, its been said before, but your attention to detail is truly bloody amazing. This creation should go on show at a design centre to show the difference between engineering and design and the pains of trying to marry the two. Very addictive reading but a bit like comparing my skills to Marquez on the track...i.e. pointless aspiration!!
KeeeeeeP on posting!!
_________________
Not as many bikes as I would like and already too many to keep up with! |
|
| Back to top |
|
|
Gavin944888
Joined: 29 Jan 2014
Posts: 572
Location: Essex....way South of Scotland
|
| Posted: Thu Jan 04, 2018 1:44 pm Post subject: |
|
|
happy New year to you all......here is some more detailed nonsense relating to my obsession!
Once the airbox had been blasted, it was time to start the basic rebuild and final position.
But before this the fuel tank had to be finalised and located in order to check clearances.
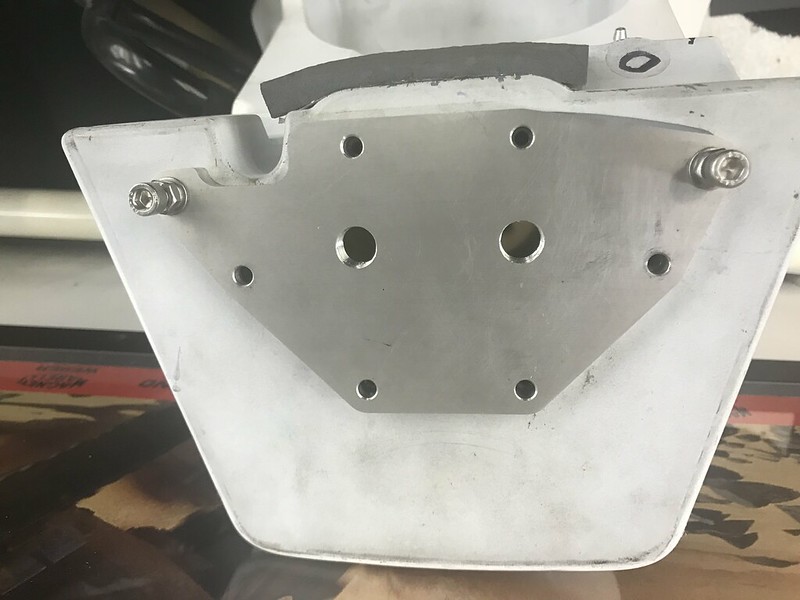
An Alloy base plate without the fuel pump had to be made (the OEM fuel pump could not supply enough fuel for the Supercharged system)....Oh Lordy
 IMG_0646 by Gavin Robertson, on Flickr IMG_0646 by Gavin Robertson, on Flickr
The BSP outlets should be able to supply the 255 ltrs/hr @ 5bar pressure pump taken from a SUBARU
 IMG_0663 by Gavin Robertson, on Flickr IMG_0663 by Gavin Robertson, on Flickr
On the tank and just the fuel filler cap to mount (the 2 M6 bolts locate the rubber belts which hold the rear of the tank down)
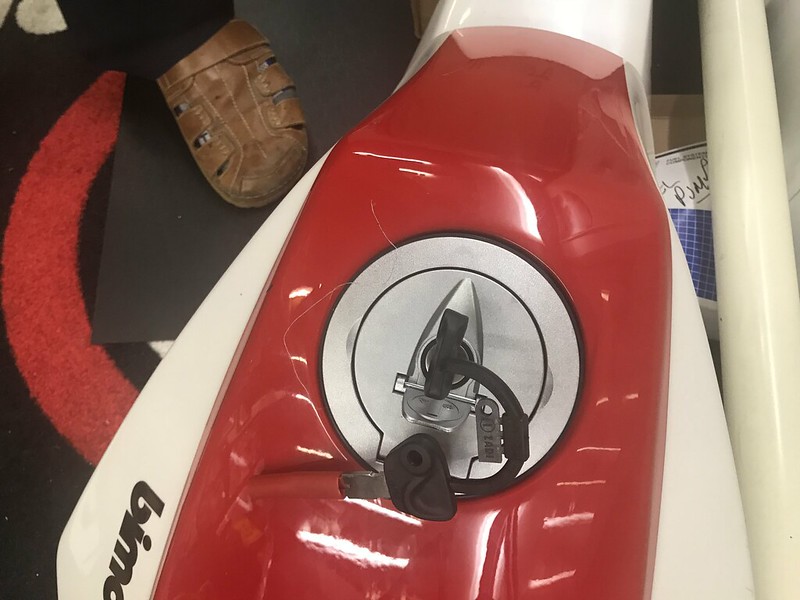 IMG_0662 by Gavin Robertson, on Flickr IMG_0662 by Gavin Robertson, on Flickr
Those are my size 10s.........feet like a ballet star!
 IMG_0621 by Gavin Robertson, on Flickr IMG_0621 by Gavin Robertson, on Flickr
The rear of the tank is held also by the metal plates either side as per the DB8-9 and 11.....the DB7 has the one piece carbon unit locating the tanks general position.
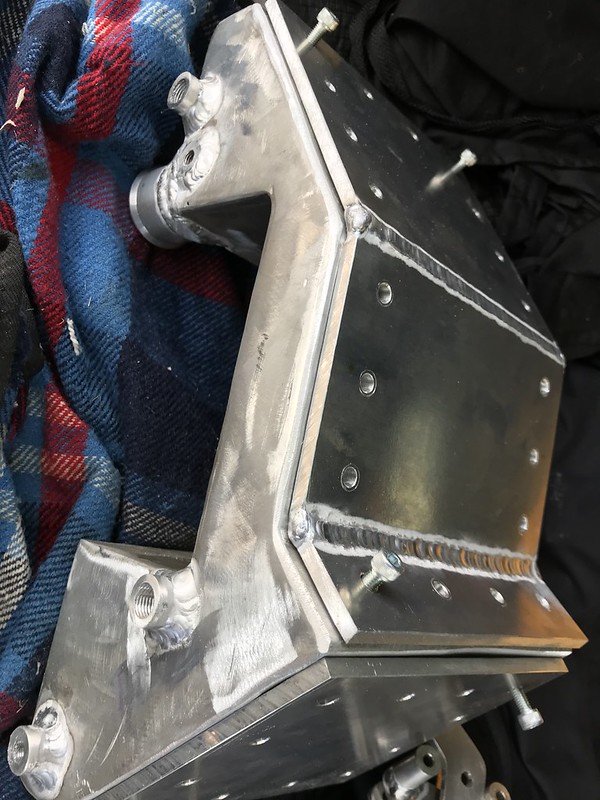
Here is a unfinished... as in welded and yet to be ground, side plate .....it will be powder coated satin black as per the frame.
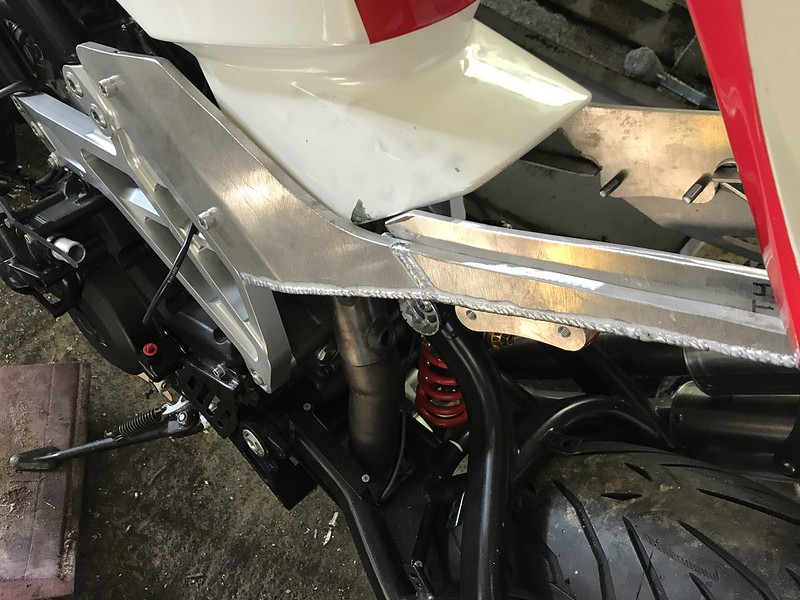
 IMG_0618 by Gavin Robertson, on Flickr IMG_0618 by Gavin Robertson, on Flickr
This is the other side view and you can see the exhaust bracket .....the is another one on the opposite side....if I ever go 2 into 2 as per the initial design.
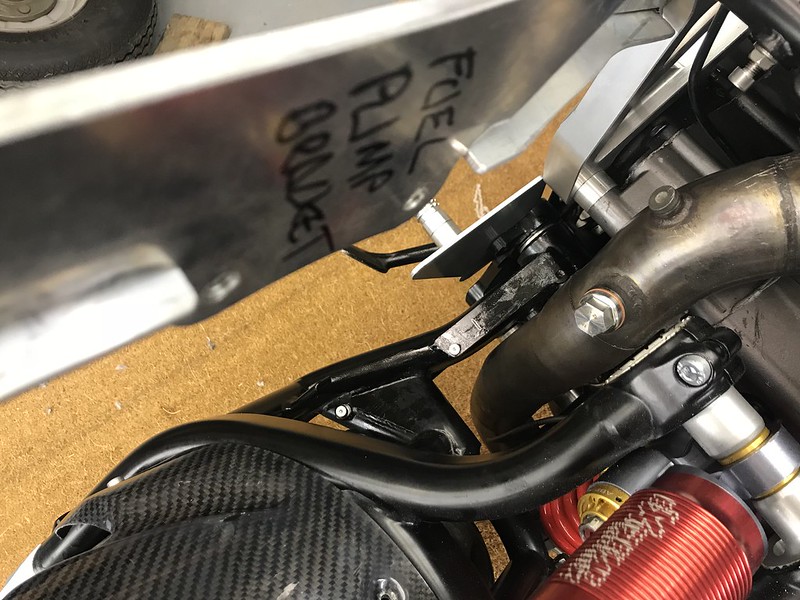
But in the meantime they will hold the fuel pump and fuel filter.....both well away from any heat source.
 IMG_0626 by Gavin Robertson, on Flickr IMG_0626 by Gavin Robertson, on Flickr
Next up.... is the side plates and the seat supports....added to which the battery and electronics need to be mounted.
You can also see the raised rear buffer pins, now that the tank sits 20mm higher than the standard DB7.
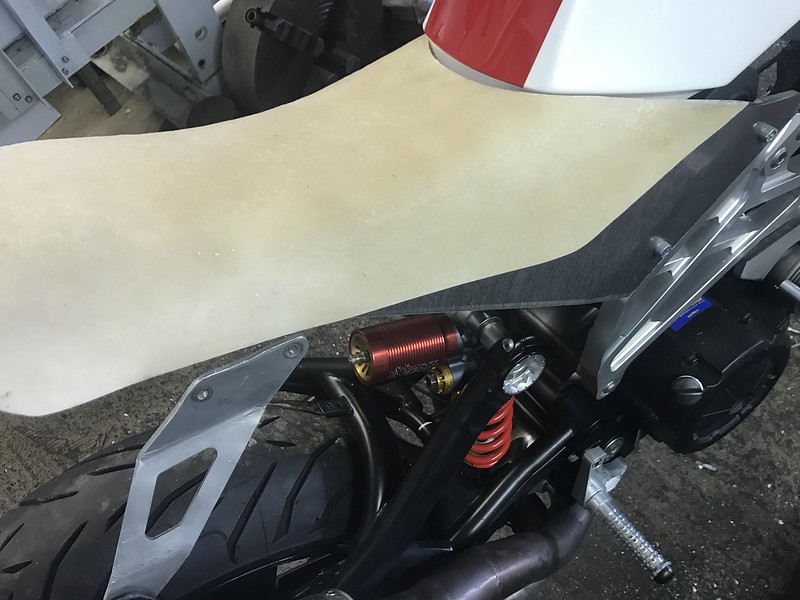
 IMG_0648 by Gavin Robertson, on Flickr IMG_0648 by Gavin Robertson, on Flickr
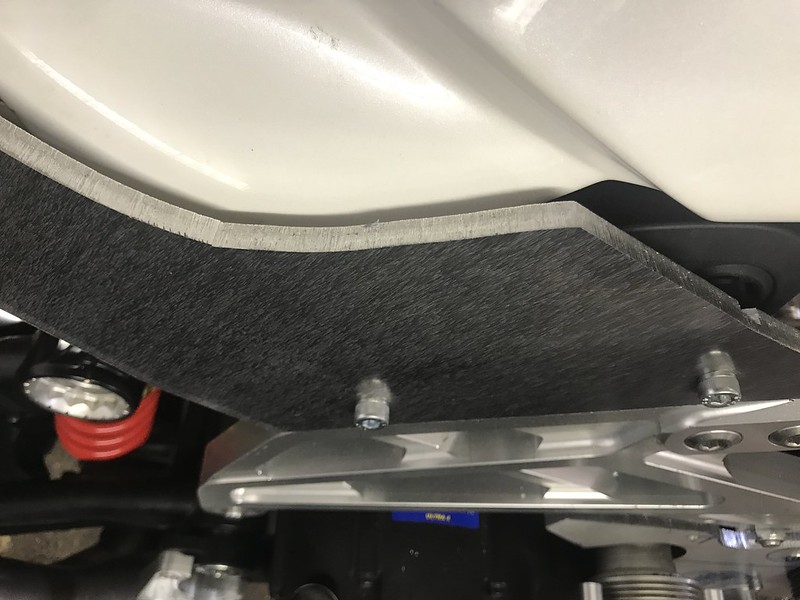
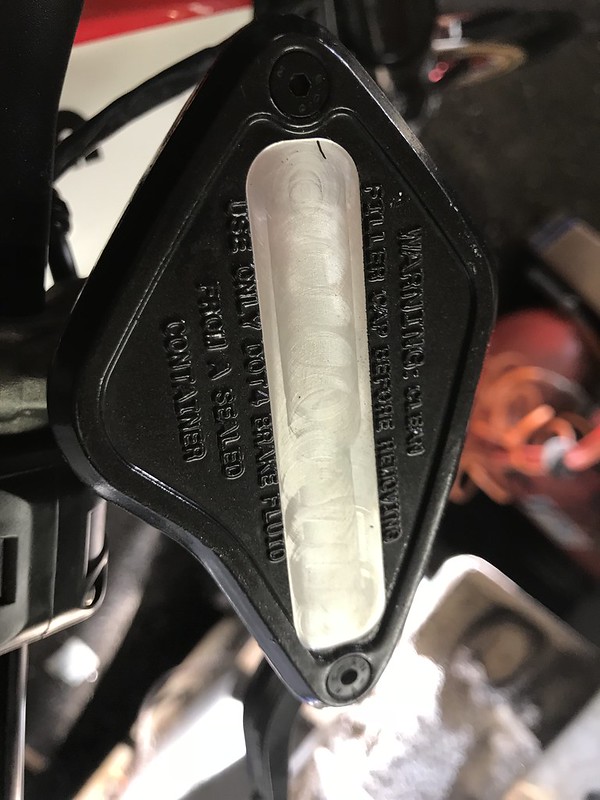
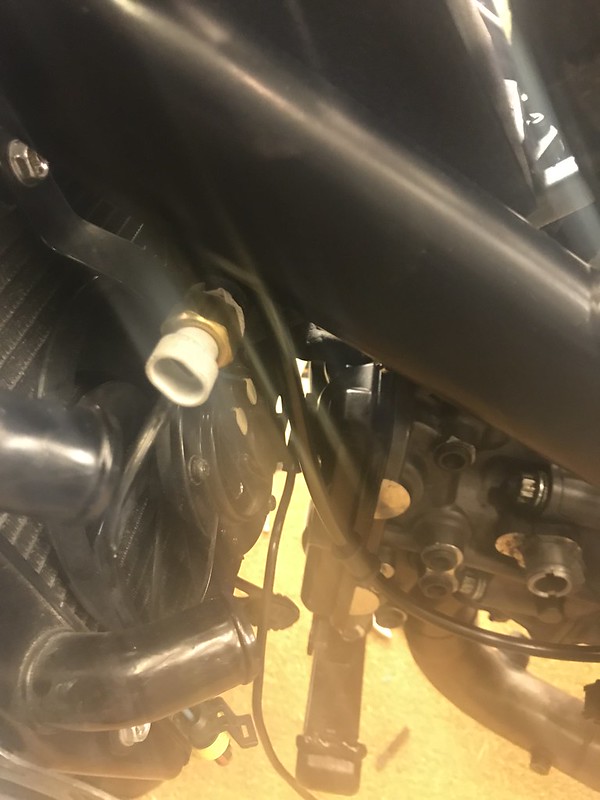
The chain guard was next ...by that I mean the re located white PTFE thingy.
 IMG_0664 by Gavin Robertson, on Flickr IMG_0664 by Gavin Robertson, on Flickr
Once this was located....the lower carbon mudguard could be loosely fitted.
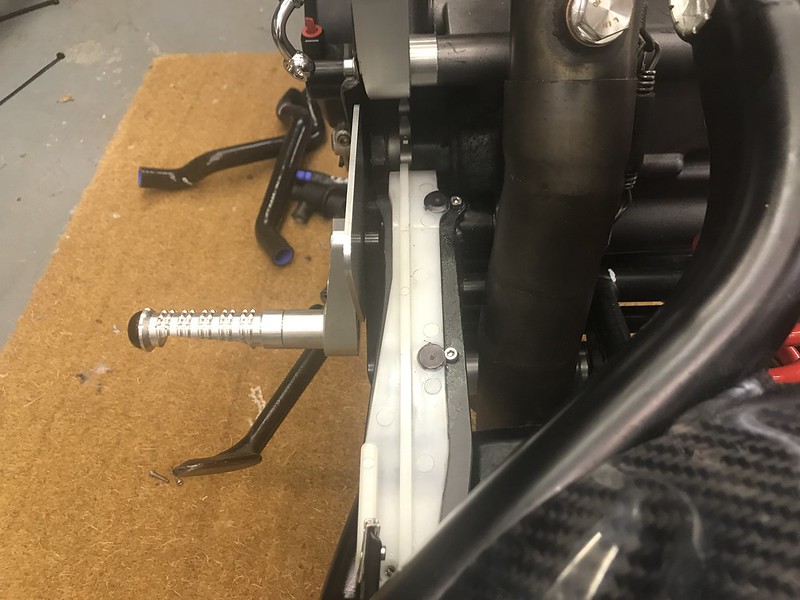 IMG_0660 by Gavin Robertson, on Flickr IMG_0660 by Gavin Robertson, on Flickr
The final position ..........and the final look, prior to the 525 chain being fitted.
 IMG_0665 by Gavin Robertson, on Flickr IMG_0665 by Gavin Robertson, on Flickr
The next step was fitting the Supercharger unit in final situ with all new O rings.
 IMG_0630 by Gavin Robertson, on Flickr IMG_0630 by Gavin Robertson, on Flickr
Cleanliness is needed ........and patience.
 IMG_0628 by Gavin Robertson, on Flickr IMG_0628 by Gavin Robertson, on Flickr
A suitable gasket material was sourced to withstand heat, fuel, oil and abuse
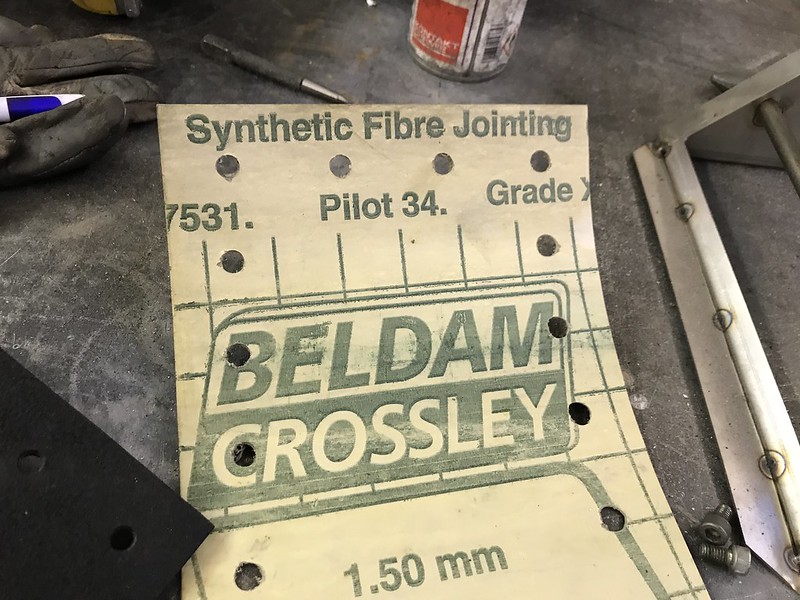 IMG_0636 by Gavin Robertson, on Flickr IMG_0636 by Gavin Robertson, on Flickr
We might have to remove the lids ...lots of times...so a strong 'maintenance free' gasket was key.
 IMG_0635 by Gavin Robertson, on Flickr IMG_0635 by Gavin Robertson, on Flickr
There is still some doubt over the injectors and I made these lids to gain access easily
Also it allows me to modify them to accept, addition injectors rather than making a new airbox.
IMG_0616 by Gavin Robertson, on Flickr
this image shows the machining needed to get the 3 mating surfaces to square up....you can see the taper in the powder coating....before being cleaned off.
 IMG_0627 by Gavin Robertson, on Flickr IMG_0627 by Gavin Robertson, on Flickr
Having the surfaces flat... makes general assembly a bit easilier.
 IMG_0631 by Gavin Robertson, on Flickr IMG_0631 by Gavin Robertson, on Flickr
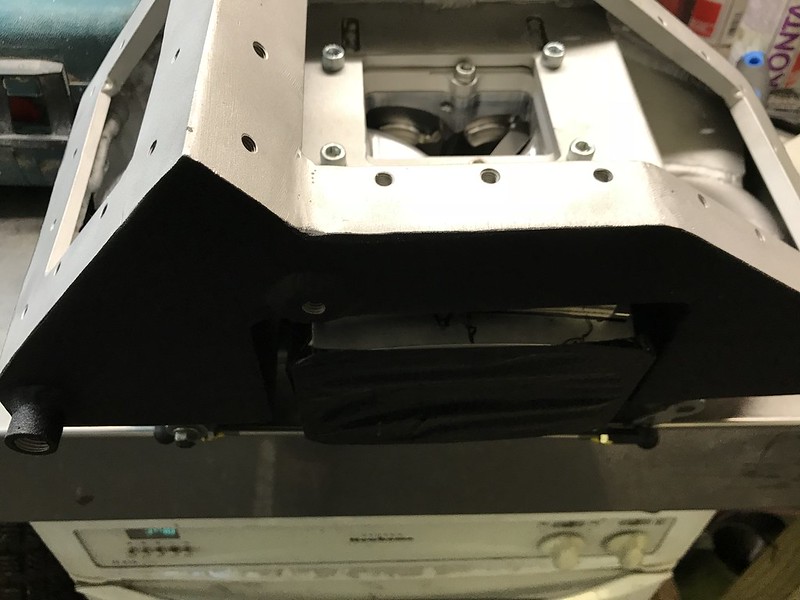
Air temp sensors and Air Pressure sensors have to be added to the airbox.
 IMG_0632 by Gavin Robertson, on Flickr IMG_0632 by Gavin Robertson, on Flickr
Space is at a premium and every addition adds to complications...in what goes where.
 IMG_0652 by Gavin Robertson, on Flickr IMG_0652 by Gavin Robertson, on Flickr
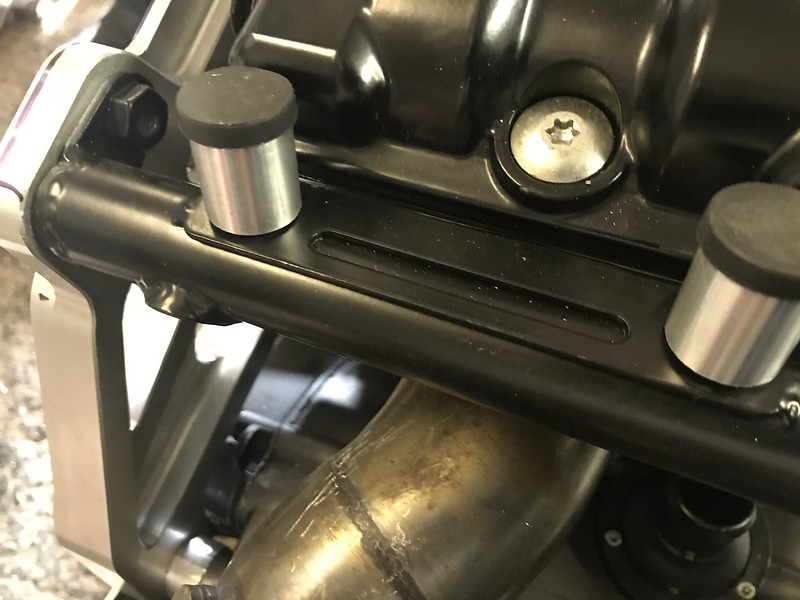
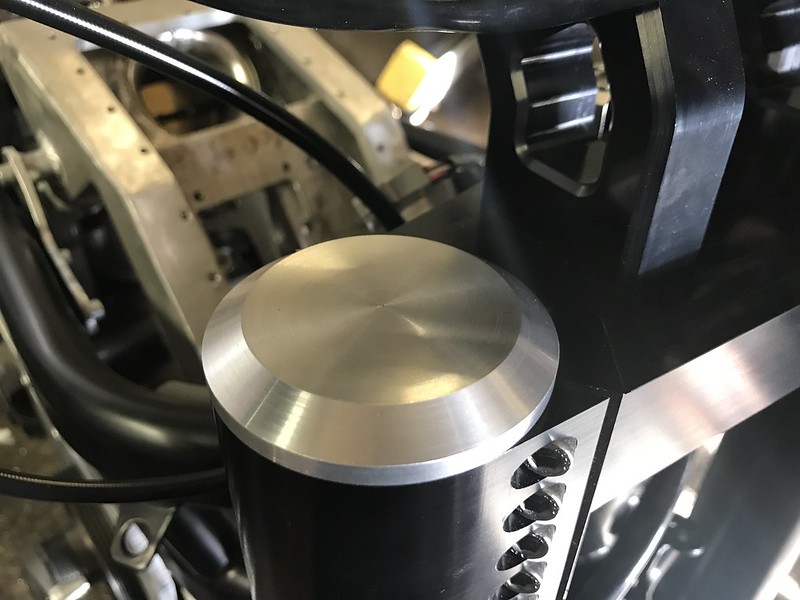
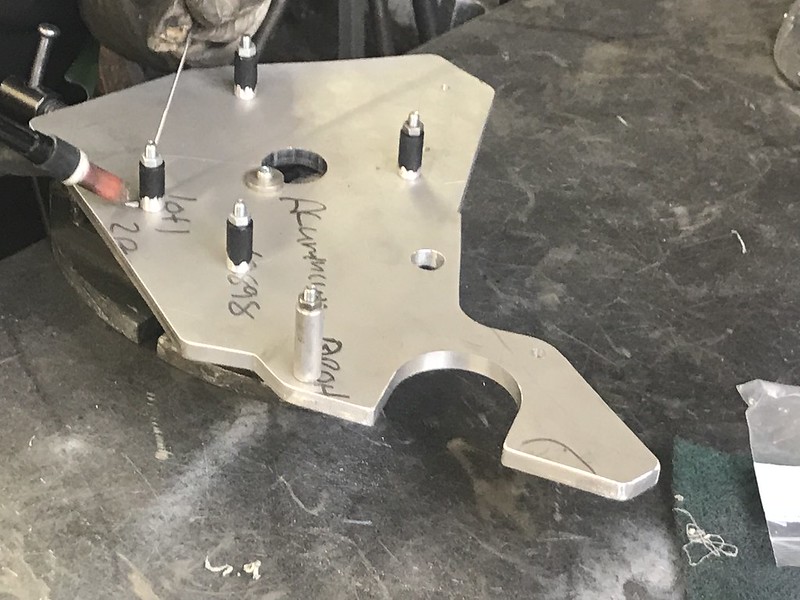
In addition the Airbox has to be securely fixed to the frame to stop and inertia from the 18000 rpm turbines.
These are the main fixing points, they locate on plates which mount to the frame.
 IMG_0656 by Gavin Robertson, on Flickr IMG_0656 by Gavin Robertson, on Flickr
The 2 stainless hex headed plugs are blanks for addition sensors or addition fixings.
With the Supercharger and Airbox bolted .....I can move on to some other bits.
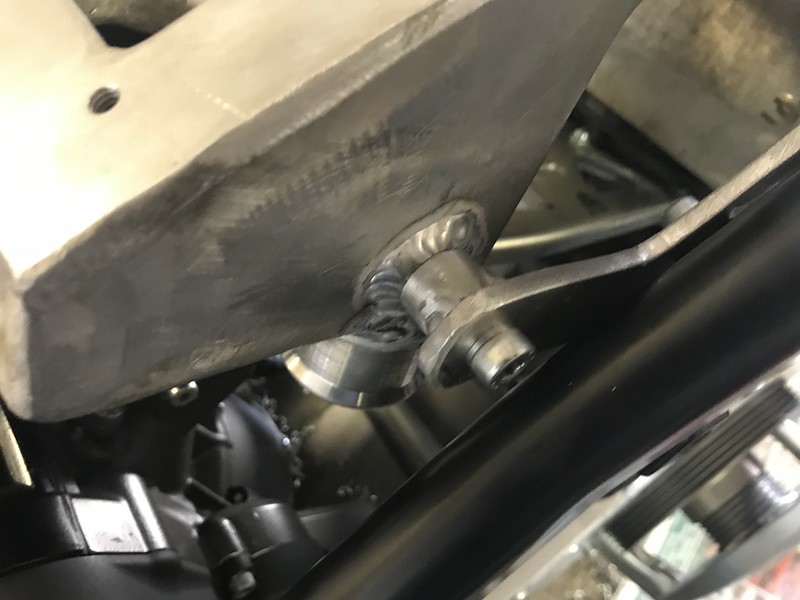
 IMG_0649 by Gavin Robertson, on Flickr IMG_0649 by Gavin Robertson, on Flickr
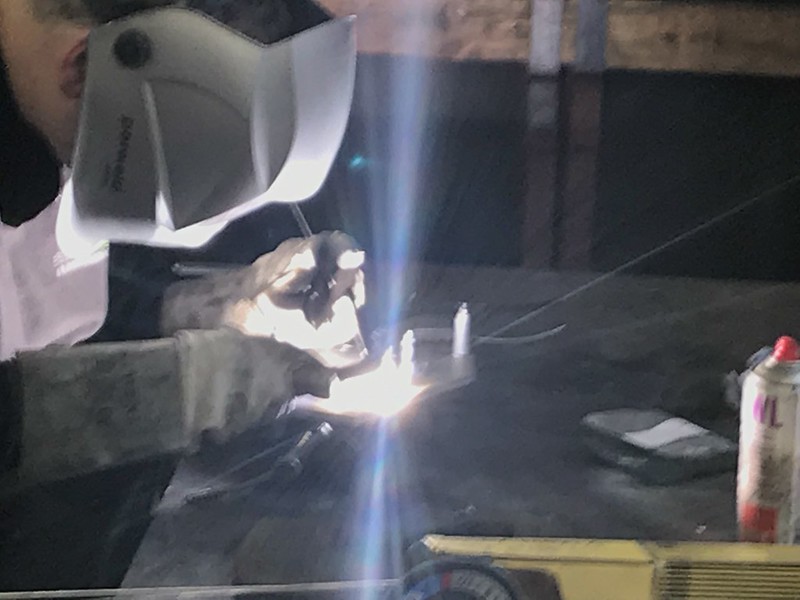
The side plate could have its spacers welded in to position.
 IMG_0643 by Gavin Robertson, on Flickr IMG_0643 by Gavin Robertson, on Flickr
Allowing the bearing supports and pullies to be mounted...prior to belts.
 IMG_0644 by Gavin Robertson, on Flickr IMG_0644 by Gavin Robertson, on Flickr
 IMG_0638 by Gavin Robertson, on Flickr IMG_0638 by Gavin Robertson, on Flickr
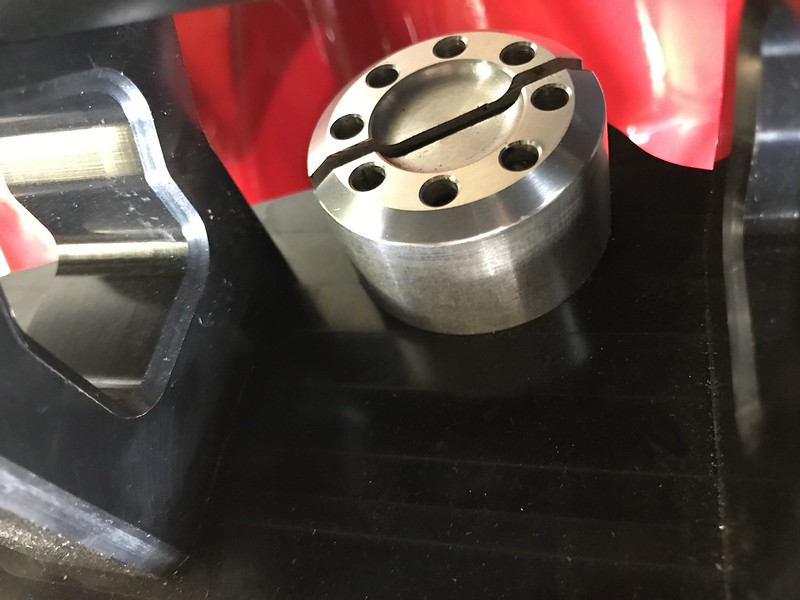
Once the pullies went on.....they would not pull off....tapped withdraw bolts had to be added.
 IMG_0640 by Gavin Robertson, on Flickr IMG_0640 by Gavin Robertson, on Flickr
Once these were drilled and tapped.......... you just insert 4 M6 bolts and the pulley should easily come off.
The front of the bike got the clutch and brake lines along with the dash fairing support.
 IMG_0651 by Gavin Robertson, on Flickr IMG_0651 by Gavin Robertson, on Flickr
Brake and Clutch cables were made from a kit form VENHILL....an excellent product.
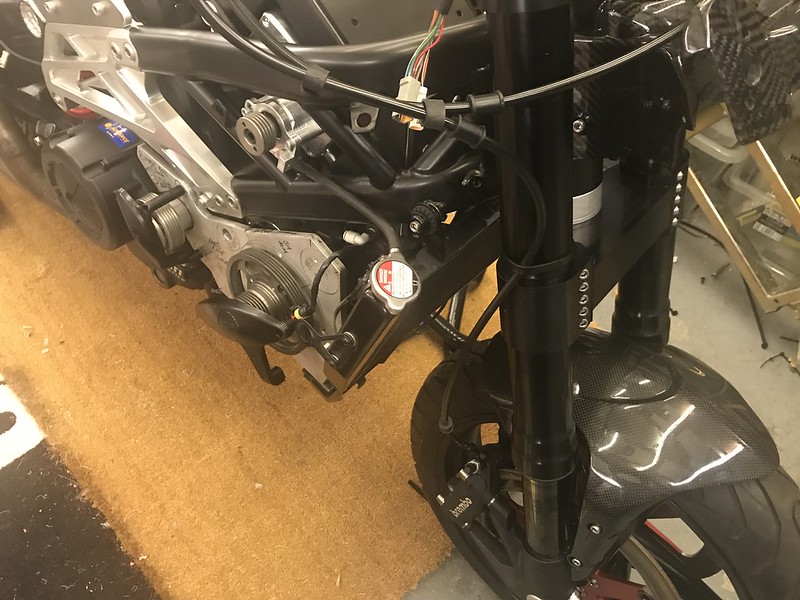 IMG_0655 by Gavin Robertson, on Flickr IMG_0655 by Gavin Robertson, on Flickr
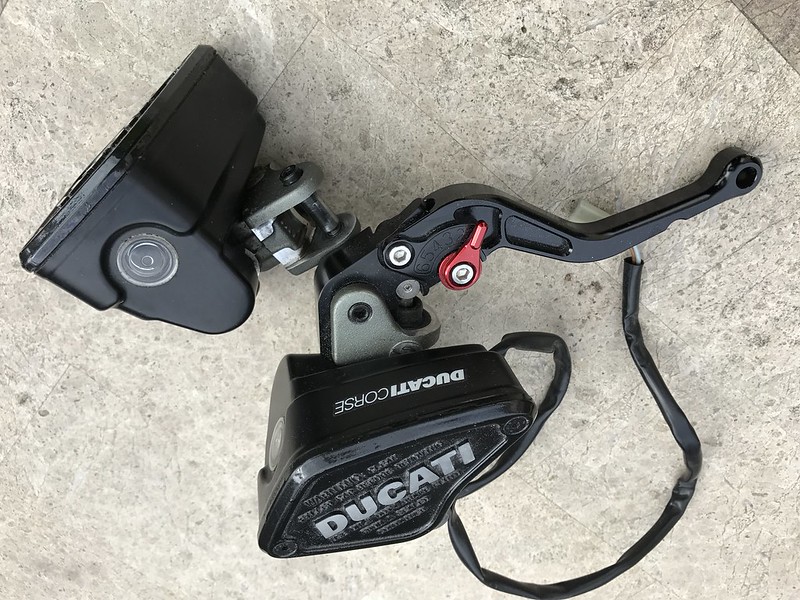
And here are the machined DUCATI master cylinders ....but with BIMOTA
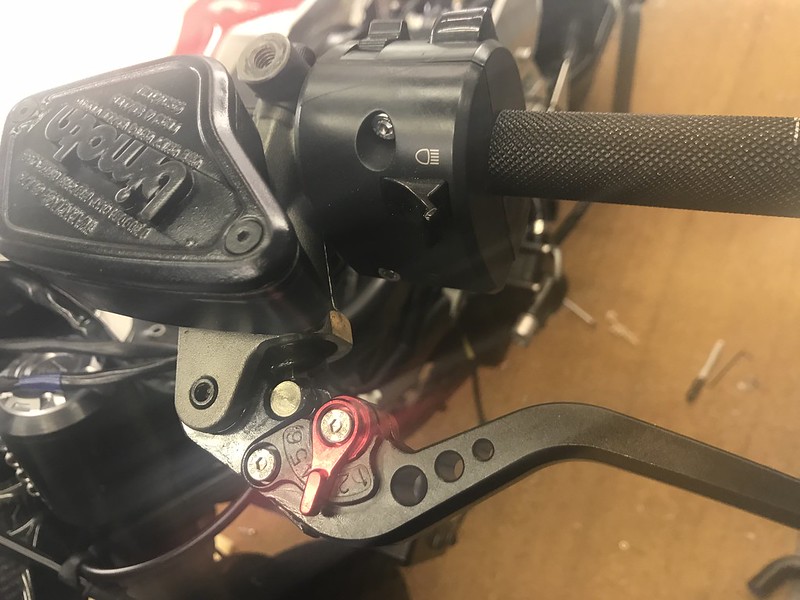 IMG_0653 by Gavin Robertson, on Flickr IMG_0653 by Gavin Robertson, on Flickr
Belts have been chosed...adjusters fabricated and support blocks positioned.
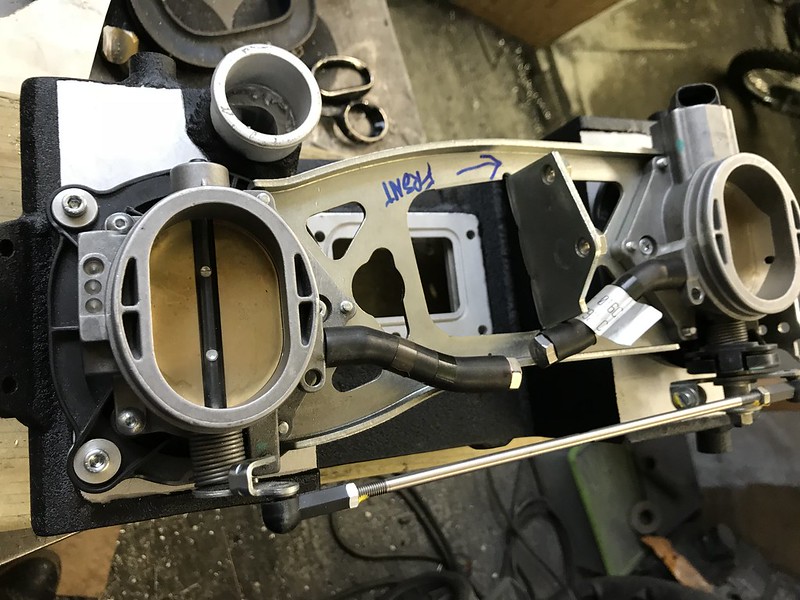
Next is the actual air intake with all that this involves....a in line throttle assembly!
More studying required...although the air bypass system is almost complete.
Thanks for the kind words of support...they helped...at times...Jeez!
Gavin
_________________
On an Island in the River Thames!
Cagiva Elefant 888/955 & adventure sidecar
Cagiva Elefant 999r engined
Cagiva BIMOTA Motard Concept
BIMOTA DB9 (with DB11 rear-end)
BIMOTA DB7-11 VLX MULE (build coming to an end)
BIMOTA DB11 VLX Supercharger |
|
| Back to top |
|
|
TVRRICH

Joined: 05 Feb 2016
Posts: 211
Location: Coventry UK
|
| Posted: Thu Jan 04, 2018 7:39 pm Post subject: |
|
|
| Great and interesting stuff as usual Gavin, keep the updates coming ,really look forward to them |
|
| Back to top |
|
|
brian
Joined: 22 Aug 2011
Posts: 3790
Location: Australia
|
| Posted: Thu Jan 04, 2018 10:06 pm Post subject: |
|
|
Love it. Nice work
_________________
'99 DB4 #104, '96 SB6 #1165, '94 DB2 J #652, '99 DB4 #088, '08 VTX1800, '93 ZXR750R M1, '95 ZXR750, '95 ZXR750 Race Bike, '94 CBR400rr NC29 Race Bike, '94 CB250, '49 BSA C10 250, '61 BSA A10 650, '89 ZXR750, '91 Ducati 851 |
|
| Back to top |
|
|
who

Joined: 10 Nov 2010
Posts: 402
Location: Melbourne Australia
|
| Posted: Fri Jan 05, 2018 12:28 pm Post subject: |
|
|
| Lovin the madness... excellent! |
|
| Back to top |
|
|
CBR_DBR
Joined: 19 Sep 2015
Posts: 25
Location: Canberra Australia
|
| Posted: Thu Jan 11, 2018 8:42 am Post subject: Wow! Just, wow! |
|
|
Hi Gavin,
Every time I think this thing can't get any better it just does! 
As I said before, I am in awe of your skills in this build. Love the details like the Bimota branding on the master cylinder covers and the supercharger set-up is pure engineering p@rn.
I hope you'll have it ready for the Northern hemisphere summer and you get to enjoy the result of this spectacular project.
Cheers,
Mike |
|
| Back to top |
|
|
Gavin944888
Joined: 29 Jan 2014
Posts: 572
Location: Essex....way South of Scotland
|
| Posted: Tue Feb 06, 2018 3:28 pm Post subject: |
|
|
Back again..........
So, we are at a critical stage, in as much as everything is finished and the bike is waiting to go to Wisbech Cambridgeshire where man are farmers and sugar beet prevails.
However, this story is lagging behind the actual timeline in order that there are no massive gaps and loss of interest (from me)
XBIKES has now supplied the 50K Triumph to the Sheik of something and a Ducati Desmosedici is having the latest V4 Panigale wiring loom added to it
(it appears that wiring and electroics have come on a bundle (technical term) since the launch of the Ducati GP replica in 2006) after this it is my turn!
_________________
On an Island in the River Thames!
Cagiva Elefant 888/955 & adventure sidecar
Cagiva Elefant 999r engined
Cagiva BIMOTA Motard Concept
BIMOTA DB9 (with DB11 rear-end)
BIMOTA DB7-11 VLX MULE (build coming to an end)
BIMOTA DB11 VLX Supercharger |
|
| Back to top |
|
|
|
|
You cannot post new topics in this forum
You cannot reply to topics in this forum
You cannot edit your posts in this forum
You cannot delete your posts in this forum
You cannot vote in polls in this forum
|
Powered by phpBB © 2001, 2005 phpBB Group
The Bimota Forum has no official connection to Bimota S.p.A.. We just ride or are interested in their motorcycles and support the brand. All trademarks are acknowledged |

