| View previous topic :: View next topic |
| Author |
Message |
quikduk

Joined: 13 Aug 2016
Posts: 287
Location: Southern California, USA
|
 Posted: Fri Sep 29, 2017 4:09 pm Post subject: DB6 leaking fork oil. Posted: Fri Sep 29, 2017 4:09 pm Post subject: DB6 leaking fork oil. |
 |
|
Well while I have been messing around trying to find time to continue my electrical search for WHY my signals don't work, I noticed that both of my forks had puddles of oil beneath the legs. 
I can't get the wipers down to see if my Seal Pro tool would work to clean up the seals so I just chatted with Pyramid Parts and ended up ordering the 50mmx63mmx11mm seal and wiper kit from them. I should see it in a few days so maybe I'll get time this weekend to tear things apart further.
Just one more thing on my list of to-dos this weekend...along with other vehicle maintenance, yard maintenance, garage organization, etc...
It never ends does it?!!! |
|
| Back to top |
|
 |
quikduk
Joined: 13 Aug 2016
Posts: 287
Location: Southern California, USA
|
| Posted: Mon Oct 30, 2017 3:20 pm Post subject: |
|
|
I got my fork seals in from Pyramid Parts 2 weeks ago but the wipers were missing. I contacted them and 2 weeks later they showed up. Great company!
Now if I can just find the time to work on the DB6... 🙄 |
|
| Back to top |
|
|
quikduk
Joined: 13 Aug 2016
Posts: 287
Location: Southern California, USA
|
| Posted: Mon Sep 17, 2018 1:52 am Post subject: |
|
|
Wow! Talk about necroposting...lol
I need help and advice. I found some time to start this maintenance work up again, pulled one leg out...and have no idea what type of spanner socket to use to remove the fork cap.
Any suggestions are appreciated (preferably ones that help me remove the cap without damaging it or the finish.
Thanks |
|
| Back to top |
|
|
2bims

Joined: 03 Apr 2010
Posts: 7292
|
|
| Back to top |
|
|
2bims
Joined: 03 Apr 2010
Posts: 7292
|
| Posted: Mon Sep 17, 2018 9:39 am Post subject: |
|
|
These are a bit better.....different sized pins....wrong side of the pond for you though.....perhaps not so strangely.....Mountain bike shops and suppliers are a good source as Marzocchi stuff was all over such bikes....Now...whether you buy the 3mm or 4mm....Hhmmm.....4mm should be snug tight....and can be taken down with careful judicious filing if not quite fitting
http://www.reactivesuspension.com/product-detail.php?product_id=112
4mm adjustable pin wrench is what you need to be looking for.....Note that if you have an angle grinder they usually come with a 4mm double pin wrench to remove the blade/disc.....but they are fixed ones to locate over the centre hole
https://www.ebay.co.uk/sch/i.html?_from=R40&_trksid=m570.l1313&_nkw=4mm+pin+wrench&_sacat=0 |
|
| Back to top |
|
|
2bims
Joined: 03 Apr 2010
Posts: 7292
|
| Posted: Mon Sep 17, 2018 10:27 am Post subject: |
|
|
These are a bit better.....different sized pins....wrong side of the pond for you though.....perhaps not so strangely.....Mountain bike shops and suppliers are a good source as Marzocchi stuff was all over such bikes....Now...whether you buy the 3mm or 4mm....Hhmmm.....4mm should be snug tight....and can be taken down with careful judicious filing if not quite fitting
http://www.reactivesuspension.com/product-detail.php?product_id=112 |
|
| Back to top |
|
|
2bims
Joined: 03 Apr 2010
Posts: 7292
|
|
| Back to top |
|
|
quikduk
Joined: 13 Aug 2016
Posts: 287
Location: Southern California, USA
|
| Posted: Sun Sep 23, 2018 11:53 pm Post subject: |
|
|
Thanks for these links. I know a couple shops that may have the adjustable spanners. The holes are 3.5mm if I remember correctly.
I could buy a socket type and then re-machine the pins, spacing, etc...but then I have to borrow a mill and find the time.
I may give Race Tech Suspension a call in Corona tomorrow and see what they use.
Presently I am "vacationing" at my parents place in Incline Village, Lake Tahoe, Nevada, USA. Not bad. I could get used to this...but I am here to help work on their house so the fun and frivolity stop tomorrow.
I would like to be retired...with a lot of income of course...and more Bimotas and Ducatis and Moto Guzzis and maybe a beemer or two...oh to dream...
Regards to all. |
|
| Back to top |
|
|
2bims
Joined: 03 Apr 2010
Posts: 7292
|
| Posted: Mon Sep 24, 2018 8:28 am Post subject: |
|
|
| The ducati boys on their Forum with Marzocchi forks used a piece of steel plate.bar which they then drilled and fitted 4mm bolts and nuts to in the respective places to fit into the holes...as a 4mm bolt measures around 3.5mm on the threads.... |
|
| Back to top |
|
|
quikduk
Joined: 13 Aug 2016
Posts: 287
Location: Southern California, USA
|
| Posted: Fri Jan 04, 2019 11:38 pm Post subject: |
|
|
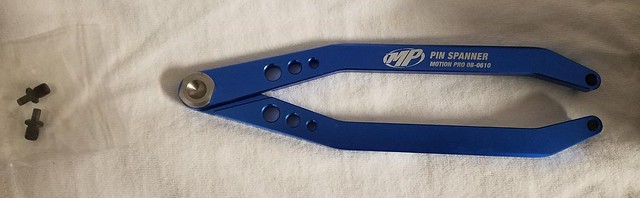
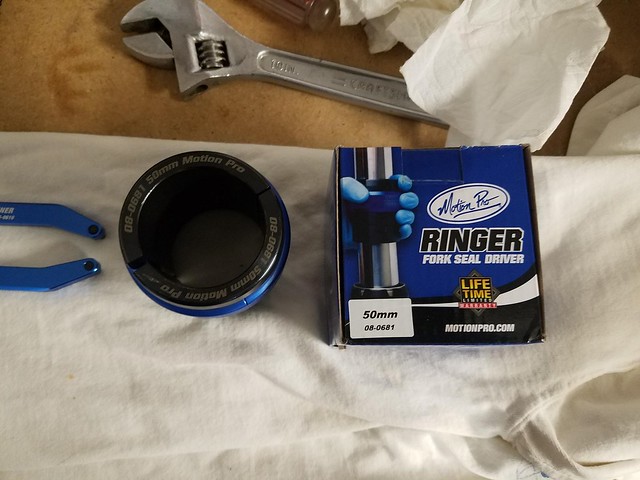
So to resurrect this thread with an update ( I have been very busy...), I finally rebuilt my forks last weekend. I had to get a 50mm fork seal slider as well as a for cap spanner. I opted for some Motion Pro models from Amazon and they did the trick.
I'll see about uploading my photos in a bit along with a narrative for those that might be somewhat mechanically challenged...not that there are many of those that own Bimotas...  |
|
| Back to top |
|
|
2bims
Joined: 03 Apr 2010
Posts: 7292
|
| Posted: Sat Jan 05, 2019 11:01 am Post subject: |
|
|
| I'd be interested in links to the tools needed...especially as marzocchi aren't around any more...and its difficult to locate the correct tools for the fork tops |
|
| Back to top |
|
|
glened

Joined: 15 Aug 2013
Posts: 135
Location: Lancashire
|
| Posted: Mon Jan 07, 2019 1:15 am Post subject: |
|
|
Interested how you get on with the Pyramid seals, replaced the seals on DB 10 with Pyramid seals and they did not last very long, maybe 6 weeks. Replaced the Pyramid seals with OEM and they have been OK for over three years now. Would be interested to know how you get on.
_________________
Bimota DB10, Suzuki TS250, Kawasaki Z1A, T120 Trton, AJS650, KTM690 Duke |
|
| Back to top |
|
|
quikduk
Joined: 13 Aug 2016
Posts: 287
Location: Southern California, USA
|
| Posted: Tue Jan 15, 2019 9:32 pm Post subject: |
|
|
| PP was the only place I could easily find these parts. I'd be interested to know a different source JIC these fail...which I hope they don't. |
|
| Back to top |
|
|
quikduk
Joined: 13 Aug 2016
Posts: 287
Location: Southern California, USA
|
|
| Back to top |
|
|
quikduk
Joined: 13 Aug 2016
Posts: 287
Location: Southern California, USA
|
| Posted: Tue Jan 15, 2019 9:56 pm Post subject: |
|
|
Next I disassembled the forks. BTW, these really dont qualify as cartridge forks say like my sons 1198 so I am not sure what the Matris replacement cartridges are about. The insert consists of a lower damper rod, spring, long plastic spacer, fork cap and nut and a long threaded center rod. Maybe I am wrong but spinning (not easily mind you) the center 22mm fork cap nut doesnt do anything but pivot the entire assembly around in the housing and making the + or marks for damping adjustment oddly oriented.

In the above photo, you can see the order of disassembly. I had to make a long 7mm hex key to fit into a socket to undo the damper rod bolt from the bottom of the fork leg. This took the help of a ½ inch air impact wrench to overcome the assembly from rotating. It is reinstalled and secured by the same method.
The photo shows the following components:
- Damper rod bolt
- Dust seal
- Oil seal spring clip
- Oil seal
- Washer
- Outer spacer (inner anti-friction coating)
- Inner spacer (outer anti-friction coating)
- Inner spring and damper rod assembly with fork cap
- Fork leg and TiN coated tube
- Outer fork tube |
|
| Back to top |
|
|
|