| View previous topic :: View next topic |
| Author |
Message |
2bims

Joined: 03 Apr 2010
Posts: 7289
|
 Posted: Thu Apr 14, 2011 11:25 pm Post subject: spring clean time Posted: Thu Apr 14, 2011 11:25 pm Post subject: spring clean time |
 |
|
Suns out so its off with the clothes and time for a good scrubbing, just need to change the oil, put her bikini on and its off to the beach (assuming that summer isn't over yet) |
|
| Back to top |
|
 |
GeeKay
Joined: 29 May 2009
Posts: 1767
Location: West Yorkshire
|
| Posted: Fri Apr 15, 2011 8:57 am Post subject: |
|
|
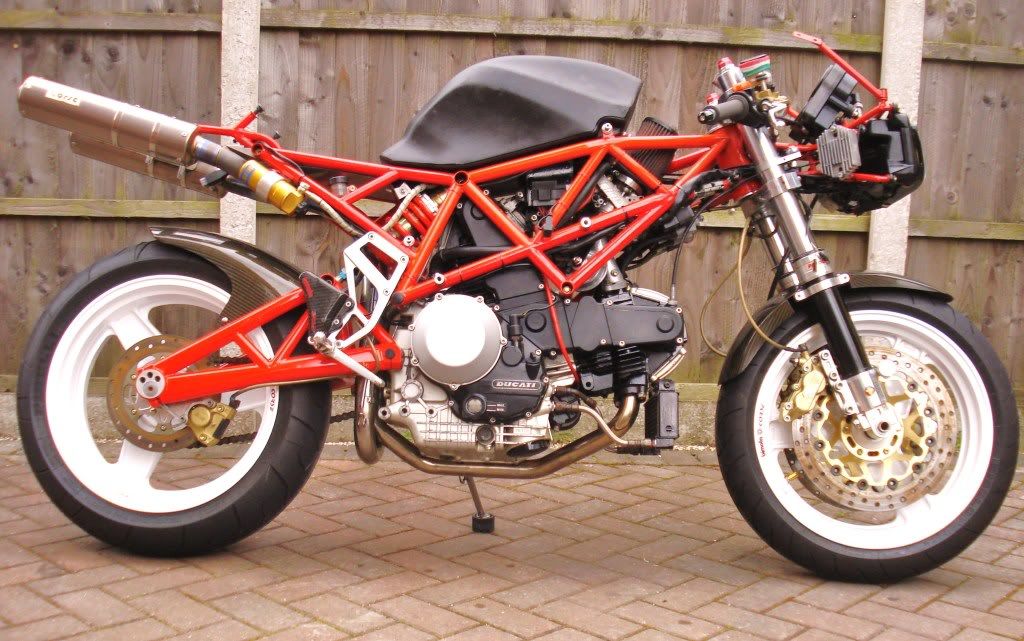
my DB3 being dismantled for attention to a leaking rear cylinder head joint.......... 
 |
|
| Back to top |
|
|
2bims
Joined: 03 Apr 2010
Posts: 7289
|
| Posted: Fri Apr 15, 2011 10:48 am Post subject: |
|
|
| To be frank she looks a lot prettier that way, not tempted to make a street bike? |
|
| Back to top |
|
|
GeeKay
Joined: 29 May 2009
Posts: 1767
Location: West Yorkshire
|
| Posted: Fri Apr 15, 2011 1:42 pm Post subject: |
|
|
It is a street bike - and a very good one too. Can ride for miles without back or wrist ache and can walk OK next day too 
I'm having a few bits powder-coated whilst it's in bits - the wheels are now gloss black, the subframe / disc spiders / handlebars etc satin black and I have had the footrest plates done in silver. Waiting for the carbon fibre sleeves for the silencers so I can re-assemble them then when I get the motor back, it's re-build time.
It wasn't a serious oil leak, but done as a precaution as I'm taking it / its taking me touring around Italy for a month.  |
|
| Back to top |
|
|
deebee4

Joined: 08 Jan 2011
Posts: 266
Location: Netherlands
|
| Posted: Fri Apr 15, 2011 8:42 pm Post subject: |
|
|
Next time just leave the wheels in, detach cables and wiring, take out the bolt that holds the shock to the swingarm and both engine bolts and roll away the frame from the engine with the swingarm still attached.
Lots of space to work on the engine if you do it that way and quicker on its way back in too.
Check bottom of swing arm chain side for chain grinding, too.
_________________
Track riding on a Bimota: FUN! |
|
| Back to top |
|
|
GeeKay
Joined: 29 May 2009
Posts: 1767
Location: West Yorkshire
|
| Posted: Sat Apr 16, 2011 1:54 pm Post subject: |
|
|
thanks for the advice DeeBee4
took the wheels out to get them coated and new bearings fitted. Couldn't get the swing arm off so left it attached to the engine when it went in for repair 
bike now ready for rebuild. |
|
| Back to top |
|
|
GeeKay
Joined: 29 May 2009
Posts: 1767
Location: West Yorkshire
|
| Posted: Mon Apr 18, 2011 8:01 pm Post subject: |
|
|
coming on nicely.........

 |
|
| Back to top |
|
|
2bims
Joined: 03 Apr 2010
Posts: 7289
|
| Posted: Mon Apr 18, 2011 8:28 pm Post subject: |
|
|
Looking good gary, did you use TripleS for your powder coating on the wheels, nice and shiney.
Happy with the front brake lines crossing the forks? My lines and calipers are dropped through the gap between the forks to keep the lines nice and loose.
Are you going for a full on refurb? |
|
| Back to top |
|
|
GeeKay
Joined: 29 May 2009
Posts: 1767
Location: West Yorkshire
|
| Posted: Mon Apr 18, 2011 9:48 pm Post subject: |
|
|
I use LSN coatings in Castleford - Mr Nash does a superb job everytime.
Brakes are as they came off the bike, they foul the mudguard if they run the other way.
Not a full refurb - just a quick "refresh" - the subframe was rusting at it's mounting points, the front disc spiders looked tatty (and I don't like gold centres), the footrest plates were scuffed and blistering etc so I've attended to those bits that had to come off. May strip the calipers and get them done satin black instead of gold. Brembo BlackLines - gotta love 'em!
Worst job so far was polishing the exhaust headers - they were a "rusty" yellow colour, so I blasted them then polished them by hand (4 hours!) to a nice satin finish (look like Titanium now) - I don't like polished pipes either! Waiting for the fake-Walnut exhaust sleeves now to complete the exhaust. |
|
| Back to top |
|
|
2bims
Joined: 03 Apr 2010
Posts: 7289
|
| Posted: Tue Apr 19, 2011 8:42 am Post subject: |
|
|
| Touche with the ehaust headers, always at least half a days job. dont understand why Ducati, and Bimota use stainless steel for the job but fit them in an unfinished form, at least it means they don't rot like mild steel I suppose. You will end up with a gold lustre to them though when you first start running the bike as the pipes are only single skinned and the heat colours it to an 18K finish. More pictures when you get to the next stage please |
|
| Back to top |
|
|
Evilchicken0

Joined: 12 May 2010
Posts: 2996
Location: London
|
| Posted: Tue Apr 19, 2011 2:12 pm Post subject: |
|
|
I had mine camcoated

 
They did the cans inside and out too.
_________________
Don't read everything you believe |
|
| Back to top |
|
|
GeeKay
Joined: 29 May 2009
Posts: 1767
Location: West Yorkshire
|
| Posted: Tue Apr 19, 2011 4:21 pm Post subject: |
|
|
| just had my project RGV250 exhausts ceramic coated at Camcoat - they said it was satin black but it's more of a dark grey - but hey-ho, it should last. Left my TS400 exhaust with them for the same treatment. |
|
| Back to top |
|
|
GeeKay
Joined: 29 May 2009
Posts: 1767
Location: West Yorkshire
|
| Posted: Wed Apr 20, 2011 4:28 pm Post subject: |
|
|
waiting for new throttle cable now........

 |
|
| Back to top |
|
|
GeeKay
Joined: 29 May 2009
Posts: 1767
Location: West Yorkshire
|
| Posted: Thu Apr 21, 2011 10:43 pm Post subject: |
|
|
checking for woodworm..........

polished carbon........

like new........
 |
|
| Back to top |
|
|
deebee4
Joined: 08 Jan 2011
Posts: 266
Location: Netherlands
|
| Posted: Fri Apr 22, 2011 6:01 am Post subject: |
|
|
Hou did you magage to get that carbon fibre so shiny without respraying?
Nice to see a bimota growing again.
_________________
Track riding on a Bimota: FUN! |
|
| Back to top |
|
|
|

